Soo, you got access to Copilot, now what? Here are some best practices

Since Copilot got announced, I have been investigating what it means to be Copilot ready. There are three main topics when working towards Copilot ready, and we address all of them in our upcoming conference, https://m365revival.com/ February 15th in Oslo.

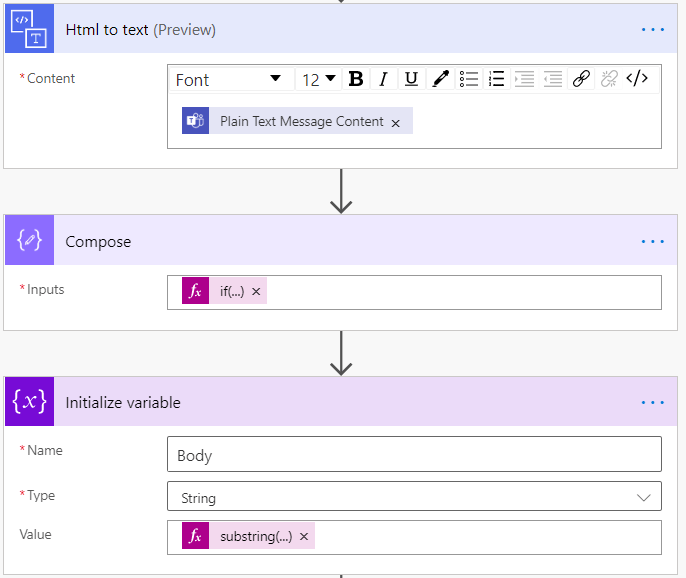
Today, my team and I got access to Copilot in our production tenant. What I know is that everyone is testing this out now, so what did I communicate to them? I focused on informing about access, setting expectations of what they could accomplish, and created a routine to gather lessons learned in a live loop component. Read what I posted and maybe you can use parts of this for when you are communicating to your pilot group. This is the Teams thread I started for my pilot group

Here is what I posted

We have purchased and assigned the Copilot for Microsoft 365 license, and we are waiting for it to be activated through group based licensing. It would be useful to measure how long it takes, so we can inform our customers as well. (Took around 15 minutes)

We should document good practice prompts in the loop component later in this post, here is the link Copilot Prompt Engineering

Here are some key points to consider and document as we use Copilot and gain experience for our customers:

  • Copilot chat in Teams can access data from Graph and you can ask about your calendar, emails, chats, conversations and files
    • Go to your app menu in Teams, search for Copilot and add the Copilot (new) app not M365 Chat
  • Copilot in Word, Excel, PowerPoint needs to be fed documents, but we should use links to documents in OneDrive and SharePoint
    • Copilot showed up in web versions quickly, but after a day, a sign out of Office and back in again Copilot showed up in PC clients too
  • Copilot in Office, OneNote and Loop only works with the current document and general knowledge
    • In Loop, insert new content and Copilot should be the first choice
    • Copilot in OneNote can be found in ribbon, appeared after Office client sign out and sign in
  • Copilot requires the new Outlook, but not the new Teams which means it works on Teams mobile
  • We have turned on Copilot in Teams meetings so that you don’t need to start transcript to use copilot in Teams meetings, we have turned on transcript in Teams calls so that you can use Copilot in 1:1 calls
    • For now we see that turning on transcript is a requirement, we will see when the news announced at Ignite takes effect
  • We can use Copilot studio to explore other sources, such as our accounting application

I think we are ready to use Copilot, but we need to follow some important rules:

  • We should run all our processes in Teams and channels, not in private chats, because our colleagues cannot see our chats. This way, we can ask Copilot about the status of a project and get a summary of the documents we have worked on, because we work out loud
  • We store our documents in SharePoint
  • The way we have built our Teams and sites, there should be no oversharing, but if there are any sites we should exclude, let me know
  • I am confident we have not shared anything we should not have shared, and that only the right people have access to Teams and channels

Do you have any other suggestions or questions on what we should focus on?

While I wrote this post, Copilot got activated and this post is rewritten by copilot based on my post 

In an ideal situation, how would I drive a Copilot project?

  1. Use my Digital Wellbeing Teams culture module to communicate how to drive internal processes and communication. Short version, use Teams channels, not chat and not internal emails.
  2. Create a prompt success case that everyone gets to try when they get access to Copilot, such as a document they can create in Word, then create a PowerPoint based on the Word document, then add design elements. Have a conversation in Excel and use Copilot in Teams to have a conversation about your projects. This helps people to understand what they can accomplish with Copilot.
  3. Use Copilot Labs to share best practice Copilot Prompts and teach users how to talk to Copilot like try to do one thing with each command.
  4. Measure success using Microsoft 365 Productivity score to get information about that users are USING Copilot.
  5. Measure success by investing in Viva Insights Premium to get HOW users are using Copilot as far down as on departmental level. Which department are succeeding, which department has more potential, how much are they using it and how are they using it. Do we see other productivity gains such as fewer meetings, more dialogue in Teams or other behavioral changes. Viva Insights can measure this.
  6. Use Viva Glint and Pulse to get the subjective experience with Copilot with weekly, monthly and quarterly feedbacks from employees. How are they succeeding, capture success cases, get feedback on what they need more information about.
  7. Make sure data quality and data security is taken care of, you can exclude SharePoint sites from being discovered by Copilot. Use Sensitivity Labels to classify your documents.

The thing is, that these topics are not new, we have been talking about them for the past 10 years, but now all of a sudden, they are more relevant than ever. Is Copilot success a competitive advantage? I think so, and the clock is ticking for getting there. What if your colleagues in other companies are succeeding, becoming more effective and exponentially work smarter than you and your team? What are the consequences, do you dare to get left behind?

13 years of blogging and 2 000 000 views

Today, January 26th 2023, I hit a huge milestone. 2 000 000 views since I started blogging in 2009. msunified.net has been the home for me to share technical nuggets about Exchange, OCS, Lync, Skype for Business, Teams and Microsoft 365 for over 13 years. I have even shared productivity tips which has culminated in to my Digital Wellbeing thinking. I want to reflect and share my 10 all time most visited blogposts, my 5 favorited blogposts, some external articles I have written and share what I am working on these days.

If you have found any of my articles useful at some point, give this article or the social media post you found this through a like 👍 :)

10 all time most viewed blogposts

My 5 favorite blogposts which I often use today

External articles I have written for other sites and Tech Community

Office 365 for IT Pros

For four years, between 2018 and 2022, I contributed to the calling and meetings chapter for Office 365 for IT Pros. I strongly believe in that format, because it gets updated monthly😱 Tony Redmond heads up that book and the author team does a fantastic job of keeping you up do date on best practices and technical facts in Office 365. Blogposts are seldom kept up to date and that is why you have seen less blogposts here these years, since they get outdated faster than you can type :) I recommend you go and buy a subscribtion to Office 365 for IT Pros right now👍

msunified.net moving forward and what I am currently working on

Do I think blogposts are still worth it today? yes and no. No for “how to” blogposts because learn.microsoft.com is so much better than Microsoft documentation has ever been. Maybe you would rather suggest a change to the learn article if you find information missing. Yes when you want to share a routine, script, your understanding and design principles. I would say no to opinion pieces on a personal blog, maybe you want to share those on LinkedIn or a third party blogsite

These days I work mainly in two areas

  • Digital Wellbeing and working smart with Microsoft 365 combined with Microsoft Viva
    • I published 8 hours of deep dive training for free on YouTube which are indexed here
    • I recently rebranded as a Digital Wellbeing coach delivering inspiration talks, keynotes, leadership training and organizational training based on my Digital Wellbeing thinking :)
    • I run workshops, proof of concepts and talk at conferences about Microsoft Viva
    • I am part of the #VivaExplorers an enthusiastic gang of over 60 MVPs who bring their own angle in to the broad world of Microsoft Viva thought leadership and understanding.
  • Complex hybrid deployment for Exchange/Skype for Business/Teams
    • I see larger more complex and risk averse companies stretching or migrating to Microsoft 365
    • In those more locked down environments we need to be more precise in knowing what works and how
    • These past years i have spent a lot of time as advisor and hands-on with hybrid Exchange solving problems like free/busy, Autodiscover, oauth, hybrid modern auth, Outlook Mobile and making sure nothing is more open than it should be, some of it resulted in this blogpost and I might blog more about troubleshooting these scenarios
    • Same for hybrid Skype for Business, but that is easier than hybrid Exchange, if you have gone down the route and set up a proper Edge server topology :)
  • Make sure you check out my YouTube channel to get my latest videos and talks I do that other channels shares

Thanks to everyone who visits my blog on a daily basis and I think I struck a nerve when blogging about Set the custom Focusing status in Microsoft Teams from PowerShell using Power Automate which is daily the most visited blogpost on my site :)

Digital Wellbeing and working smart in Microsoft 365

Digital Wellbeing in Microsoft 365 is about working smart with the tools you have at your disposal. There is a difference between having access to the tools and using them as intended. With the introduction of Microsoft Viva and specifically Viva Insights, we now see where Microsoft is headed. They are now all about using the tools and building good collaboration cultures. Viva Insights can measure meeting culture, chat culture and how much off hours working is done. But it is not enough to just tell people to use less internal emails, move away from chat and over to channels and work less in evenings. It is difficult to envision how to work in a different way when the change that needs to happen must happen in the individual and in the group.

This is where Digital Wellbeing comes in to the picture. The four modules I have defined as part of Digital Wellbeing is the HOW and WHAT when culture shows you WHY you need to change. The four modules are

  • Capture
  • Process & Execute
  • Teams Culture
  • Notifications

Full workshop for free on YouTube

During March 2022 I recorded everything I know about Digital Wellbeing and you get the all four modules for free. This ended up as 8 hours and 30 minutes of insights, demos and how to’s. You can view the full index with timestamps under each video in this blogpost.

Watch the explainer video

To get started, watch the video explaining the four modules in 14 minutes

Module 1 – Capture

Capture is all about storing your thoughts, ideas, dreams and tips in to Microsoft To Do. Meeting notes and deeper notes are captured in OneNote. The goal is to create stash-zones for your content so that you find them again. Why exactly To Do and OneNote? Watch my deep dive video explaining everything you need to know to get started with capture.

Modul 2 – Process & Execute

Taking capture to the next level is to reflect, process and organize your captured material. A task in To Do which you have captured could be a link to an article you want to read, reference material for your project, it could be someone asking you for more information or the start of a project. Organizing this unstructured information and breaking the tasks in to goals and actions will help “future you” make sense of the captures. The execute component of this module is about prioritizing the most important tasks for you that day, reserving time in your calendar using focus time in Viva Insights and using the Pomodoro technique to focus on one task for at least 25 minutes without distracting yourself. At the end of the day, you reflect on how the day went by using Viva Insights Virtual Commute. This is much harder than it sounds so we need to talk about this. Watch my deep dive video explaining all the details for this module

  • Digital Wellbeing: 0:00
  • Agenda: 5:40
  • Lists and List groups in ToDo: 7:47
  • Sorting and prioritizing tasks: 18:09
  • Recurring tasks: 28:19
  • Section Groups in OneNote: 36:21
  • Reflecting on your career: 41:28
  • Sorting to OneNote: 52:29
  • Organizing meeting notes: 55:01
  • Sorting to Microsoft Lists? 1:02:04
  • Planning time for focus: 1:16:17
  • Get started with My Day: 1:27:19
  • Breaking tasks into actions: 1:41:19
  • Executing on your tasks: 1:48:18
  • Reflecting on your day: 2:21:16
  • End note: 2:39:40

Module 3 – Teams Culture

For you to have a good day in Teams three things needs to happen

  1. Conversations about processes needs to move from chats to channel conversations so that you get the ability to mute parts of the conversation.
  2. We want larger Teams with more channels, rather than many teams with fewer channels and we want people to tag a person, a tag or the channel when reaching out. Never tag the Team (unless you are the Team owner or administrator) because there is no way of muting those notifications.
  3. Meetings should start and end in channel conversations, or chats if they are ad-hoc meetings. In that way we may save a number of meetings that are meetings about the meetings you are going to have and meetings about the meetings you just had. That is just a waste of time, respect yours and your colleagues time.

These are the topics we cover in the Teams culture module, watch the deep dive session here

Module 4 – Notifications

Notifications is the #1 skill everyone needs to master the next decade. Why? Work is not a place it is a mindset. The moment you see a notification about work, you instantly get pulled in to work mode. What more is that a timer seems to go off in your head and you feel you need to respond within 30 minutes. This is the challenge we are living in today, that you get notifications about not important information at the wrong time. There are three questions you need to ask yourself when you get a notification on your computer or mobile

  1. Why did you get the notification?
  2. Was it useful?
  3. How can you tune it so you get it not at all or at the correct time

This is what we dive in to in the module 4 video and we take is far as going through how to disconnect during vacation. Read my Microsoft TechCommunity article on notifications to get a jump start.

  • Digital Wellbeing 0:00
  • The challenge with notifications 5:02
  • Notifications in Teams 18:41
  • Quiet time in Teams mobile 32:37
  • Notifications in social media 47:48
  • Digital Wellbeing on Android 1:08:33
  • How to vacation 1:21:01
  • How to vacation Book time 1:28:05
  • How to vacation Inbox Zero and Brain dump 1:34:48
  • How to vacation Plan your first week getting back 1:40:34
  • How to vacation Quiet Time 1:43:30
  • End Note 1:47:23

End note

Digital Wellbeing can help you get your head above the water, perform better at work and at home and it will just make you happier in your life. Happiness comes from you feeling you are mastering your busy day and using the tools in smart way and removing stress from your life. That is what Digital Wellbeing is all about.

Teams Phone Number Management with Get-TeamsNumbers.ps1

I believe assigning phone numbers in Microsoft Teams can waste hours for an organization with multiple ranges and locations. What if you could run a PowerShell routine to find the next available number in a number range and at the same time know how many numbers you have left?😱 Now you can, with Get-TeamsNumbers.ps1. Watch my full session from Commsverse21 at the bottom of this post where I demo this script routine.

Fun fact: This script is based on my very popular phone number management routine I crated for Skype for Business Server 2015 called Get-SfBNumbers.ps1.

Disclaimer: This tool is provided as is and you are free to re-use the routines found in the script for your own use, but should not be incorporated in commercial products without author’s consent. If you got any feedback on the script let me know on Twitter.

Get started

  • Download the script from GithHub.
  • I prefer to open it in PowerShell ISE.
  • Add your number ranges and numbers in retention.
Figure 1: Add your ranges and numbers you want to reserve. If the script give and Int32 error on the range, I have experienced that the formatting of the above code can be wrong, try typing it manually instead of copying it
  • Before you run the script, make sure you Connect-MicrosoftTeams with the latest version.
    • You need to be either Teams Communications Administrator, Teams Administrator or Global Admin to run the script.
    • The numbers cannot be discovered via GraphAPI, only via the Teams PowerShell module.
  • Save the script and run it directly in PowerShell ISE.
    • Use examples to see how it can be run as normal ps1 script.
    • I prefer to run it in ISE because then you can play with the $Reports variable which I will show you later.
  • Keep in mind that it may run for a while if you have thousands of users.
  • Already after first run, you should get some good results as shown below.
    • The routine works for number used through Calling Plans, Operator Connect and Direct Routing.
Figure 2: Notice that there are 42 numbers in retention, these are classified as Gold and Silver numbers. You can add your own numbers in retention as well. You see total numbers available which is useful in order to know that you have enough numbers.

What it does

  • Uses Get-CsOnlineUser to fetch all users and accounts with a populated LineURI.
    • This includes Auto Attendands, Call Queues, Meeting Rooms, Common Area Phones and all other objects with a phone number.
  • Creates a complete overview of all numbers and number ranges.
    • Exports to csv C:\_Report\PhoneNumbers<Date>.csv so that you can import it to Excel.
    • Prints a GridView so that you can do a direct sort and search.
    • Prints the summary of all ranges to console.
    • What the script does can be controlled in the parameters section at the top of the script.
Figure 3: All settings can be specified in the parameter section

Find all available numbers for a range

The advantage of running the script in ISE is that you get access to all the variables the script uses. A very useful variable is the $Report variable. Notice that all number ranges has an Identity and has and attribute called AllAvailableNumbers. You can use these to get all numbers and then start assigning them in bulk to users. In Figure 2 we see the number range has Identity set to 2 which we can use like this:

Figure 4: Getting all available numbers as an array which again can be used for bulk assignment

Automatic retention of numbers

There might be numbers you don’t want to give to normal users, but you want to reserve for Auto Attendants, Call Queues or VIP users. The script automatically classifies Gold and Silver numbers based on regex. I have not created this regex myself, it is based on the script routine Paul Valiant provided for me back in 2015. It still works well :) My slide from my talk at Microsoft Ignite 2015 is still valid, when explaining Gold and Silver numbers.

Figure 5: Examples for Gold, Silver, Bronze and cultural numbers you should consider not to assign to users.

You can reserve your own numbers at the top section of the script, and notice that you can add your own comment and it wont be offered as the next number

Figure 6: The comment will also show in your csv export and GridView output.

Attend my session at Commsverse to learn more

I am speaking at Commsverse 15-16th of September 2021 about phone number management. In that session I will explain this script routine, but go even further and show how it can be used in automation and how to troubleshoot phone numbers for users and explain why country code is key for Microsoft Teams Phone System. Read more here.

Watch my full session from Commsverse21 where I demo this script routine

Managing phone numbers for users when using Direct Routing, the new Operator connect or event through Calling Plans? MVP Ståle Hansen got you covered. Learn his routine for automating numbers, identifying Gold, Silver and Bronze numbers and even reserving single numbers for re-use.

What you will learn
– How to automate finding available numbers for new users
– How to reserve numbers for future use
– Assign and troubleshoot phone numbers for users.

Goodbye Skype for Business Online, you wont be missed

July 31st 2021 is the date when Skype for Business Online (SfBO) was decommissioned. It was a good run, but we wont be missing the service. Why? Because Microsoft Teams is a more modern, cloud native service which has proven itself during difficult times with over 250 Million Monthly active users.

I wrote an article on what will happen and how you can jumpstart the process yourself at Practical 365. I also talk about what is possible when Teams is the only choice in Microsoft 365.

Read my full article at Practical 365 on what the SfBO decommission means for you and how to get started with the move today: https://practical365.com/skype-for-business-online-is-retiring-what-does-it-mean

Skype for Business Server (SfBS) is still an option

But you should set up hybrid and consider moving your meetings to Teams. Then you will get the best of both worlds, local telephony, familiar chat in SfBS and modern meetings in Teams. The key element to a hybrid setup is that it is all federation traffic between your on-premises environment and Microsoft 365. If you have configured federation in your environment today, then you have all components in place. There are two caveats though:

  1. The Edge server needs to resolve its federation DNS records, it is therefore recommended to make sure you use a public DNS server on the public network leg on the Edge server. This is because the sip domain is shared between SfBO and SfBS.
  2. All Front-End servers with users need to have access to SfBO services. It is recommended to open all FQDN’s and IP address from the Front-End server to SfBO and as specified in the URLs and IP documentation for Teams and Skype. You should also open for authentication services at ID 56 and 59 in the table. This is because the Front-End servers log on SfBO when you move users online. They need to be able to authenticate and connect to the online services. It is not enough to open for just one server since it is the server where the user is homed that opens the connection.

If you want to migrate from Skype for Business Server with telephony to Teams and Direct Routing the process might include the following steps:

  • Implement SfB hybrid.
  • Validate PowerShell connectivity from one of the Front-End servers.
    • Required to be able to move users.
    • Remember that you must use the Teams PowerShell module as the SfBO PowerShell module has been retired
  • Implement the SBC.
  • Set up and validate Direct Routing.
  • Move users to the cloud using the direct to Teams PowerShell switch.
    • This will move the users directly from SfBS to the Teams service.
  • Assign OnlineVoiceRoutingPolicy to the migrated users-
  • Finalize the migration.
  • Reconfigure internal and external DNS with pointers to SfBO, such as sip.domain.com, lyncidscover.domain.com CNAME records and federation SRV records.
  • Turn off the SfBSs for 1-2 weeks.
  • If there are no reports of service issues, you are ready to remove all SfB users by running the Disable-CsUser cmdlet, which removes all SfB attributes from user accounts.
  • Start the decommission process by clearing out the SfB servers in topology builder and publish the topology. This will clean up Active Directory for references to servers and roles.
  • Replicate the Configuration Store.
  • Run setup on all SfBSs and uninstall roles.
  • Disjoin all servers from Active Directory.
  • Decommission all SfBS servers.
  • This article documents these steps

How to configure policy settings for Microsoft Teams Webinars

If you have not used webinars in Microsoft Teams yet, you need to configure some policy settings. Webinars are enabled in your tenant by default, but the ability for external people to register for your events or view the engagement report is disabled. Meetings support up to 1000 attendees for enterprise customers and 300 attendees for M365 Business Premium customers, but the overflow setting is disabled by default. At GA these settings could only be configured using PowerShell, here is how you do it.

#Install latest Teams PowerShell module
#The force switch enables you to install the newest version if you have an older version already installed
Install-Module MicrosoftTeams -force

#Connect to Microsoft Teams
#Minimum requirement is that your user is enabled with the Teams Communications Administrator Role
#Teams Administrator and Global Administrator role works too
Connect-MicrosoftTeams

#Default config
Get-CsTeamsMeetingPolicy | Format-List Identity, AllowEngagementReport, WhoCanRegister, AllowPrivateMeetingScheduling, StreamingAttendeeMode 

Identity                      : Global
AllowEngagementReport         : Disabled
WhoCanRegister                : EveryoneInCompany
AllowPrivateMeetingScheduling : True
StreamingAttendeeMode         : Disabled

#New config
Set-CsTeamsMeetingPolicy -Identity Global -AllowEngagementReport Enabled -WhoCanRegister Everyone -AllowPrivateMeetingScheduling $True -StreamingAttendeeMode Enabled

#Result
Get-CsTeamsMeetingPolicy | Format-List Identity, AllowEngagementReport, WhoCanRegister, AllowPrivateMeetingScheduling, StreamingAttendeeMode 

Identity                      : Global
AllowEngagementReport         : Enabled
WhoCanRegister                : Everyone
AllowPrivateMeetingScheduling : True
StreamingAttendeeMode         : Enabled

Now you are ready to run public webinars, get the engagement report and even have more than 1000 attendees using the overflow to live event feature from user number 1001. You may want to create a separate Teams Meeting Policy for those booking webinars, and not user global as I have done in the above example.

In our environment we were running on AllOn built in policy and it turns out that you cannot set this setting on built in policies, only on custom policies and Global. Also the AllOn MeetingPolicy is depricated so do not use that one. If you are like us, using an old built on policy and want to set global Teams meeting policy, you can either do it manually per user in the Teams Admin Center or you can use powershell and loop through users and revert back to the global policy. If you are not specifying a UPN in the below command, it will loop through all your users and set global policy on all of them, be careful when doing this in production. Setting the policy to $Null will revert you back to a global policy.

Get-CsOnlineuser <UPN> | Grant-CsTeamsMeetingPolicy -PolicyName $Null

Fellow Office 365 for ITPros author, Tony Redmond has a well written blogpost explaining the settings in detail. Teams Meetings Get Webinar Capability (practical365.com).

Cloud-based mailbox storage and Exchange hybrid attack surface reduction with Teams calendar and Outlook Mobile

Secure Remote Work from Anywhere is the trend of 2021! This trend has forced more companies over to Microsoft Teams for meetings and wanting to utilize conditional access, MFA and Outlook Mobile for on-premises hosted users. They are not ready to migrate everything to Microsoft 365 but want to use the secure remote work components. Meetings in Teams and MFA for Outlook Mobile are the main drivers.

The questions are, what is stored in Microsoft 365 when the mailbox is still on-premises and can we limit the attack surface for Exchange on-premises in this setup? The answers has two parts.

Part 1: When user is still on-premises, does not use Outlook Mobile but uses calendaring in Microsoft Teams

The great news is that the Teams clients connects via the Teams Backend Service to EWS to get calendar data. This means that you do not need to expose the on-premises Autodiscover and EWS to the clients for calendaring in Teams to work. It is enough to limit access to known Microsoft IP ranges found in the Office 365 URLs and IP address ranges article. The Teams Backend Service will den relay the parsed calendar data to the Teams client requesting the data. I got this information from a very informative and detailed TechCommunit article by MVP Thomas Stensitzki Microsoft Teams and on-premises mailboxes: Part 2 – Teams Calendar App Troubleshooting. Also read How Exchange and Microsoft Teams interact for a general understanding

Nothing is stored in Microsoft 365 in this scenario, except for personal chat activity for compliance reasons. How can you know? You can run a content search against the user and verify that no calendar events are stored in Exchange Online. You can navigate to Microsoft 365 Compliance Center and go to Content Search and click New search. In the keyword field you type a title of a calendar event for the user you want to search. Then you find the actual user you want to search and click Save & Run. Note that you need to have Compliance Administrator role assigned to your admin user and you need and exchange license with online mailbox for result preview to work.

The result should be empty and you have validated that no calendar data is cached in the cloud-based mailbox. To see Teams chats and meetings stored for compliance reasons you can add Kind:MicrosoftTeam as a keyword. Then re-run the search and validate that you can find the Teams data stored for compliance reasons. The Add App Content for On-Premises Users checkbox specifies that you are searching the cloud-based mailbox of the user. Read more about this process here.

What is a cloud-based mailbox?

  • It is created to store compliance records for Microsoft Teams personal chat and meeting activity
  • It is not possible to log on or access the mailbox in any scenario
  • It requires at least an Exchange Online Plan 1 license assigned to the user
  • It is used to cache emails for 28 days when you use Outlook Mobile to access the on-premises mailbox
    • includes four weeks of email, all calendar data, all contact data, and out-of-office status, source
    • If you do a search further back than 28 days, the resulting data is stored for 1 day, source
    • Outlook Mobile on iOS caches attachment for only 7 days, source

Part 2: When user is still on-premises and uses Outlook Mobile

The Outlook Mobile client does not connect directly to the Exchange on-premises mailbox, but via the cloud-based mailbox. It uses the AutoDetect service, not to be confused with the on-premises Autodiscover URL, to connect to the on-premises mailbox. The cloud-based mailbox then uses Autodiscover to find the ActiveSync URL and syncs 28 days of the users mailbox data. If the user on Outlook Mobile does a search further back than 28 days, the cloud-based mailbox will cache the on-premises query results for one day before it is deleted. Read about the connection flow here

Source: Using hybrid Modern Authentication with Outlook for iOS and Android | Microsoft Docs

This means that you do not need to expose the on-premises Autodiscover and ActiveSync to the mobile clients directly. It is enough to limit access to known Microsoft IP ranges found in the Office 365 URLs and IP address ranges article. If you do a Content Search on a user that uses Outlook Mobile, you will find the cached data. Hybrid Modern Authentication (HMA) is a requirement for Outlook Mobile and on-premises mailboxes. HMA and Outlook Mobile explained are in detail in the Using hybrid Modern Authentication with Outlook for iOS and Android article.

Be aware of the following

  • Hybrid Modern Authentication prerequisites
  • The Outlook Mobile global address list (GAL) is based on objects synced to Azure AD
    • This means you need to sync out all objects that needs to be searchable from Outlook Mobile including shared mailboxes in Azure AD Connect
  • Meeting rooms needs to be synced out and if you use room finder, make sure you sync out the distribution lists building the room lists.
  • Recommendation is to migrate from Skype for Business Server to Teams if possible in this scenario
    • If that is not a possibility, make sure the Skype for Business client supports ADAL logon because it connects to Exchange On-Premises calendar through EWS which is set up with HMA
      • Use the AllowAdalForNonLyncIndependentOfLync setting as described here
    • If you are not migrating to Teams and want to use Skype for Business Mobile app, the recommendation is to set up HMA for Skype for Business Server too, as described in this article
      • This enabled MFA and conditional access to be utilized for the SfB mobile client
      • The mobile client still connects via the SfB reverse proxy so it still needs to be exposed to the internet, you cannot lock it down as you can for Exchange.
      • There is no support for Lync Server 2010 or 2013 in the hybrid environment when using HMA

What about desktops and secure remote work?

The Teams clients connect to the Teams Backend Service to get the calendar. Outlook however requires a direct connectivity to Exchange on-premises. The assumption is that VPN is used in these scenarios for desktops together with split tunneling so that Teams media and calendaring goes directly to cloud and does not put unnecessary load on internal infrastructure. If you want to expose your Outlook Web App outside of VPN, simplest solution is to use Azure AD Application proxy.

Summary

Can you lock down your on-premises environment for Exchange and use Secure Remote Work with Teams and Outlook Mobile? Yes! Absolutely. Is this the secure remote work approach we recommend moving forward for those not ready to migrate yet? Yes! Absolutely :)

Set the custom Focusing status in Microsoft Teams from To Do using Power Automate

I am happy to announce that I have a free NoCode alternative for setting the Focusing status in Microsoft Teams! This is a follow up post to one of my most popular blog posts in 2020, Set the custom Focusing status in Microsoft Teams using Power Automate invoked through PowerShell.

Update 06.10.20: Updated the flow to better handle expected failure, should now exit as success if the task has no number. Download and import the Power Automate flow from GitHub. Found a logical issue 08.10.20, the Flow is now updated👍

The Focusing custom Teams status can only be set by MyAnalytics via a calendar event called ‘Focus time‘. I have not been able to recreate this calendar event type manually, so it must be something in the header. During a ‘Focus time‘ calendar event, the Teams client sets the status to Do Not Disturb with a custom name called Focusing. Personally, I don’t like the current way MyAnalytics schedules this event since it is two hours long and weeks in advance. I need a way to set this status at the time I am focusing, to mute distractions and tell my peers that I am in a focus, deep work, flow Pomodoro sprint. This is why I created this routine.

Here is how to get started with Focusing custom Teams status

  • Create the ‘Focus time‘ calendar event in MyAnalytics
  • Navigate to your personal dashboard at https://myanalytics.microsoft.com/
    • See prerequisites further down in the blogpost
  • Click on Focus in the left menu
  • Click book now to get a ‘Focus time‘ event in your calendar which will set your Teams client in Focusing status for the duration of the calendar event
  • When this is done, it is possible to leave the plan under plan configuration or by using the below link, to avoid getting future calendar events like this.

How it works and watch the YouTube explainer video

Watch the YouTube video where I demonstrate how the routine works and how to get started

Instead of using the premium HTTP request trigger, I now use the free NoCode Microsoft To Do trigger. When a new task is created, the Power Automate flow runs, finds your default calendar, finds an existing Focus time calendar event in your language and sets the time for your Pomodoro sprint duration. It even has an option to use IFTTT to mute your phone during the sprint.

Background

I am a Pomodoro Technique enthusiast. During a Pomodoro sprint it is important to mute distractions. This worked fine with custom presence states in Skype for Business, which is one of my most popular blog posts to date. I also published a very popular blog post on a routine to use HTTP request trigger in Power Automate to set the Focusing custom mode in Microsoft Teams. The problem with that routine is that it required coding and you needed to trigger it in PowerShell using a premium trigger. To Do triggers are included in most Office 365 SKU’s. Download and import the Power Automate flow from GitHub to see how the flow is built.

  • Make sure all prerequisites are met as the described below
  • Open Microsoft To Do
  • In any list, you create a new task and in the subject you put the time interval you want to do a Pomodoro sprint to achieve deep work/flow state/focus time
    • This technique even works from mobile and web!
    • I recommend you create a Pomodoro list in To Do to keep them all in the same place and so they don’t clutter your actual Tasks
  • Up to 3 minutes later, the Power Automate flow will trigger
    • I have tuned the timers in such a way that both the calendar event and the IFTTT trigger will start at the time you created the To Do task, and not when the flow is triggered
  • The flow will then access your primary calendar and create a copy of the current Focus time event and call it “Old Focus time” for historical purposes
    • This works regardless of language of the calendar and the Focus time calendar event, I check for primary calendar and use criteria to find the correct calendar event
  • Then the flow will get the latest Focus time event and update it with the time your To Do task was created and end the event using the number you put in the To Do task subject
  • When the calendar event is created, Teams will almost instantly update it’s status and put you in to the custom Focusing status, which has the same capabilities as if you set yourself to Do Not Disturb
  • When the calendar event is done, you will revert back to the correct status for your current time, busy if you are busy in calendar or available if you do not have anything else in your calendar
  • Now you can go to your meeting or evaluate which task is most important for you and trigger a new Pomodoro sprint :)

Prerequisites

  • Calendar must be in Exchange Online
  • You must have MyAnalytics as part of your license and enabled
    • Schedule 1 period with MyAnalytics to get the calendar event
    • Available in Enterprise SKU’s
    • I recommend to turn it off again after the first run, so that you calendar does not get flooded with weekly Focusing time events
  • Download and import the Power Automate flow from GitHub
    • Go to Power Automate in https://portal.office.com
    • Navigate to My flows and click Import
    • No changes are needed in the actual flow after import is finished
  • Find one of your Focus time calendar event and set priority to low
    • This can only be done in Outlook desktop client
  • In order to find the correct calendar entry we are checking for the following
    • Priority low
    • Category: Green Category
      • In my tests the category will be named Green even though you are using a different language
    • We find the first one and edit that event, to make sure we are not editing all events
      • The flow stops after one event is edited
  • Optional bonus, not required
    • If you install the flow app on your mobile, you can get a notification on you mobile when the Pomodoro sprint starts and when it stops
    • You an use that notification to trigger an IFTTT action on Android and iOS to set them to do not disturb at the start and turn it off again
    • I even use the IFTTT trigger to control a hue light in my office, set it to red during the Pomodoro sprint and green when finishing :)
    • Read more about IFTTT triggers for pomodoro sprint here
    • In order to enable the IFTTT part of the flow, you need to go in and edit it and set the IFTTTIntegration variable to 1. It is set to 0, disabled, by default

Power Automate techniques I used to accomplish this flow

In the coming weeks I will publish separate blog posts on how I created a universal flow which works out of the box in any environment. In the meantime you can download the flow from GitHub and take a look

  • How to find the default Outlook calendar for a person regardless of language
  • How to find the default Microsoft To Do tasks list for a person regardless of language
  • How to find a specific calendar event based on category
  • How I used ticks() to find time difference in Power Automate and what I used it for
  • Substring() techniques in Power Automate
  • If() in Power Automate
  • Math is hard in Power Automate, here is how i used sub(), div(), addminutes() and length()
  • Named variables and comments in Power Automate

Use Power Automate to send Teams messages to To Do #NoCode

I am a productivity enthusiast. I use Microsoft To Do for my individual task management. When someone has a task for me in Microsoft Teams I need to get them in to To Do. MVP Vesa Nopanen created a Power Automate routine for doing this which works great. In his blog post, he talks about how to create it and how to share it with select users within your organization. I have tuned this routine to make it universally available so that no changes to the code is need for it to run in your organization. How? Read on

I created the universal routine which you can download from GitHub and try for yourself. Just import it, authorize access to Microsoft Teams and Microsoft To Do and you are good to go. Check out Vesa’s blogpost for how to share it in the organization

Originally the routine checked for the name of your tasks folder, but I found a way to do that programmatically, since the name of the folder is different depending on your language. The flow will look up the lists in user context and from there we can check which is the default one. Tasks is always the default one.

I did one more thing. When capturing the text to go in the task, I wanted to limit the length of the subject to 150 characters.

  1. I had to convert the output from Teams to plain text
  2. Then I checked the length of the body
    • if it was short than 150 characters, I used that as length,
    • if the body was more than 150 characters I limited it to 150.
    • if(lessOrEquals(length(outputs(‘Html_to_text’)?[‘body’]),150),length(outputs(‘Html_to_text’)?[‘body’]),150)
  3. Finally I created a string variable which is no longer than 150 characters and used it in the subject.
    • substring(outputs(‘Html_to_text’)?[‘body’],0,outputs(‘Compose’))

That’s it, simple and effective. You can download the flow from GitHub, make sure you read the original blog post for full details. MVP Yannick Reekmans has a different take to accomplish this using a graph approach. You still need the above routine to get the default task list.

When importing the flow, you need to have these connectors available so that you can complete the import. All connectors are part of your Office 365 subscription

Use IFTTT webhooks to mute your Android and iOS during a Pomodoro sprint

I am a big fan of the Pomodoro Technique and have written several blogposts on it. The goal is to reach flow and deep work in order to get stuff done. I currently use a PowerShell Pomodoro timer which

When you successfully reach the flow state, you forget about time and suddenly minutes and hours have gone by. This is why it is crucial to become available again after 25 minutes. You are entitled to a break, but even more important, people need to be able to reach you again. If you find that nothing special has happened, then you can plan a new Pomodoro sprint or join your next meeting.

The reason why you would use a timer like this to turn off distractions is to not disturb yourself. You are always just one notification away from breaking your flow. It takes between 7 and 30 minutes to get back in to flow.  it is too easy to be stuck in a semi available loop of task switching and not get any real work done. This is where IFTTT webhooks comes in to play.

IFTTT stands for If This Then That. By sending a web message to IFTTT you trigger an action. It is not easy to get started with but the benefits are worth the effort. To be able to easily mute your phone and turn it back on again after 25 minutes is the goal, if you don’t do this, you have the potential of breaking you flow from a notification on you phone.

The final result, iOS phones goes to Do not Disturb during a Pomodoro sprint

Setting up IFTTT

  1. The webhook URL key
  2. Android triggers and Android setup
  3. iOS triggers and iOS setup
  4. Using the triggers in the Pomodoro script
  5. Create a shortcut to the Pomodoro script

The webhook URL key

  • Create an IFTTT account or log in with your existing account
  • Go to Settings on the Webhooks service page
    • If this is the first time you are setting up a webhook, click connect
  • Copy the key at the end of the URL, as you see mine is
  • Save your key as we are going to use it as the IFTTTWebhookKey in the Pomodoro script

Android triggers

  • We need two triggers for Android MuteAndroid and UnMuteAndroid
  • First lets create the MuteAndroid trigger
    • Go to Create
    • Search for webhook and select it
    • Use MuteAndroid as Event Name
    • Search for Android and select mute and set vibrate to No
    • Finish the setup
  • Now create the UnMuteAndroid trigger
    • Go to Create
    • Search for webhook and select it
    • Use UnMuteAndroid as Event Name
    • Search for Android and select mute and set vibrate to Yes, personally I do not use sound on my phone, only vibrate
      • If you want sound you should use the Set Ringtone Volume action
    • Finish the setup
  • Install the IFTTT app on your phone and log in with the same user
  • That’s it you are now ready to mute and unmute your Android from PowerShell
    • You can test it by using the following command
    • Invoke-RestMethod -Uri https://maker.IFTTT.com/trigger/MuteAndroid/with/key/IB4In0nMeJq7pcUa6VTtQ -Method POST -ErrorAction Stop
  • In the Pomodoro PowerShell script the following values are now available
    • $IFTTTMuteTrigger = MuteAndroid
    • $IFTTTUnMuteTrigger = UnMuteAndroid
    • $IFTTTWebhookKey = IB4In0nMeJq7pcUa6VTtQ

iOS triggers and iOS setup

  • We will not install the IFTTT app on iOS, instead we will use the two apps Shortcuts and Pushcut
  • We are not going to mute the phone, but set it to Do Not Disturb
  • Pushcuts integrates with IFTTT triggers, but we need to click the notification popup on the phone or Apple Watch in order to active Do Not Disturb
  • Start with installing Shortcuts
    • Create the Do Not Disturb shortcuts as shown in the GIF
  • Install Pushcut
    • First import the shortcuts
    • Then create notifications for iOSMute and iOSUnMute and choose the shortcuts as actions
    • Test the notifications, note that you have to tap the notification for the phone to go to Do Not Disturb
  • In IFTTT you need to create the iOSMute triggers
    • Click create and choose webhook
    • in Event Name call it iOSMute
    • as action, search for and choose Pushcut
    • The first time you need to connect IFTTT to Pushcut using the QR code as shown in the GIF
    • After you have connected IFTTT to Pushcut, choose notification, iOSMute and the device you want to send the notification to
    • Click finish
  • In IFTTT create the iOSUnMute trigger
    • Click create
    • Search for Webhooks and call it iOSUnMute as Event Name
    • As action, choose Puschut, notification, iOSUnMute and select the device you want to push the notificaiton to
    • Finish to save Applet
  • That’s it you are now ready to mute and unmute your Android from PowerShell
    • You can test it by using the following command
    • Invoke-RestMethod -Uri https://maker.IFTTT.com/trigger/iOSMute/with/key/IB4In0nMeJq7pcUa6VTtQ -Method POST -ErrorAction Stop
  • In the Pomodoro PowerShell script the following values are now available
    • $IFTTTMuteTrigger = iOSMute
    • $IFTTTUnMuteTrigger = iOSUnMute
    • $IFTTTWebhookKey = IB4In0nMeJq7pcUa6VTtQ

Using the triggers in the Pomodoro script

  • Download the Start-SimplePomodoro.ps1 from GitHub
  • Open the script in your favorite PowerShell editor
  • Scroll down to the bottom of the script and populate the run command as shown in the GIF
  • Save the script and run it from PowerShell, remember to navigate to where you stored the script
Add your Spotify playlist, your triggers and IFTTT keys
The result, you need to tap the notification from Pushcut in order to set the phone in DND