This works on Windows 10, Windows 8, Windows 7, Lync and Skype for Business desktop clients. Requires administrative rights to your computer. If you are interested in setting Microsoft Teams status, check out how to set the custom Focusing status blogpost
 Wouldn’t it be cool if you could change your presence state in Skype for Business to match you current task such as busy in a Workshop, Do Not Disturb in a Pomodoro Sprint or Away Getting Coffee?
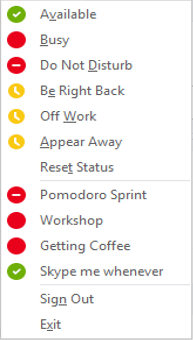
Turns out, you can by creating an XML file and adding a setting in your local registry. How? The easy way is to download my script, change the custom presences that is predefined in the script and run it.
- Download the script from GitHub
- The default custom presence states are shown below
- To change the names you need to open the script and write your own presence states
- Away does not work as a custom presence state, if you put that in no custom states will show up in the client
- The presence states that works are: Online, Busy, and Do-Not-Disturb
- To run the script, just type the following in PowerShell in elevated mode from the location you saved it
- .\Set-CsCustomPresence.ps1
- It works for Lync and Skype for Business
- It works for 64-bit and 32-bit office
- It works for MSI installed Office and Click-to-Run Office
- The xml file will get stored under c:\_CustomPresence\CustomPresence.xml if that is your systemdrive
- You need to sign out of the client and back in for the changes to take effect
- The presence states works in the following scenarios
- On English Skype for Business clients for you and your colleagues
- On Skype for Business clients in your local location retrieved using (Get-Culture).LCID
- For everyone in your Colleagues relationship level as long as they are running a client language version specified above
- If you want external contacts to see your custom presence state you need to elevate them as colleagues in the relationship pane
- Understand that they will also see you as in a meeting, in a call, your note and your location as well
- If you are in an environment with more than two languages for you Office deployment, make sure you add an LCID per language in the script
- You can find the language ID codes here
- https://msdn.microsoft.com/en-us/library/cc233982.aspx

Download the script here and use PowerShell to control your presence using the Lync 2013 Client SDK described here
You can now control you custom presence states using PowerShell, if you have installed the SDK, using the Publish-SfBContactInformation.ps1 found on GitHub here with this syntax
Publish-SfBContactInformation -CustomActivityId 1 -PersonalNote "Getting Stuff Done" -Location "@HomeOffice"
You are now ready to use this in a Pomodoro context, read how to get started with the open source PowerShell based Pomodoro timer here: https://msunified.net/2013/11/25/lock-down-your-lync-status-and-pc-notifications-using-powershell/

Thanks for ur guide, really helpful.
Firstly, I tried with ur custome statuses and it worked! However, I wanted to change the statuses and customize them from myself. I modified the ps1 file, delete the “_CustomePresence” path and the system variables created but it never worked again 😦
Any idea?
Did you replace it with your own path? Is the xml stored there? If you tried away status, that will break cyst om presence states. If all looks good. Send me your code in my contact field and I’ll take a look
Thank you very much for your quick reply! I think the problem was I added many statuses. I have tried with just four custom statuses and it worked again 🙂 Is there any limit?
I have really appreciated your attention.
Best,
Yep. Four is the limit :)
This is fantastic and very helpful – thank you so much. Three things:
1) FYI – for the step where it says to execute .\Set-CsCustomPresence.ps1…, I had to remove the “Cs” part so that name matched the downloaded file Set-CustomPresence.ps1. Just mentioning if it might help someone else out.
2) All worked great when I ran this in Windows 8 (once I changed access to unrestricted). But, when I ran it in Windows 10 Enterprise, I get 4 messages that indicate:
Set-ItemProoperty : Cannot find path
‘HKLM:\SOFTWARE\Policies\Microsoft\Office\15.0\Lync’ because it does not exist.
I don’t know what to do to try to fix this – any suggestions?
3) Is there a limit for how many characters the status values can be? I kept mine down to 17 or less (based on your examples), but I’m curious to know if there is some boundary since a few more would be helpful.
Again, thank you! Hoping I can get it to work on the Windows 10 machine.
Hi, thanks for your feedback. It works fine om my Windows 10 machines, not sure why it will not work on yours, it is also tested with Office 2016 MSI and Office Pro Plus C2R. Maybe you could try the new app for custom presence and Pomodoro timer? that way you can get the presence statuses in and edit the xml file with your own statuses. https://msunified.net/2018/04/03/announcing-the-pomodoro-pc-app/
Set-ItemProoperty : Cannot find path
‘HKLM:\SOFTWARE\Policies\Microsoft\Office\15.0\Lync’ because it does not exist.
Mine was missing too. All you have to do is go into regedit.exe as admin and add the DWORD Lync manually.
How we can set more than 4 custom states?
You can’t, 4 is the limit.
ok, thanks
I have another question. How we can get the ‘yellow’ icon beside our custom status?
You can’t set the yellow status, it is not available as custom presence. You can do available, busy and do not disturb
Thanks for the feedback.
Oh! It would be nice if we could do it. Hope somebody can come up with a resolution. I’ll keep my eyes open here.
Hi guys,
Not sure why we need an XML syntax here? Can you explain?
Thanks,
Nico
Hello Team,
It is not working on my system and any of the custom statuses are not visible on the status screen.
Are you using the correct language? your client language and LCID needs to match up
Is this working with Office 365 MSO 16.0?
Yes, I think so
Is it possible to set a default status? I would like to have it at Do not Disturb, or at least Busy. It is very frustrating to have people inundate you the moment you come online.
Yes you can set your presence before signing-in in the presence drop down menu
Hi Ståle. Thanks for your prompt answer. I am of course aware of that possibility, but I have the SfB set to start automatically at Windows logon and would like to preset the startup status.
Then I don’t have a better answer for you, unless you want to do it programmatically using the sdk
Nice try – doesn’t work. Just like the Pomodoro app, by the way.
You need to do it right, then it works ;)
Struggling to run this on Office laptop. Get following error “The file is not digitally signed. You cannot run this script on the current system.For more information about running scripts and setting execution policy, see about_Execution_Policies at
https:/go.microsoft.com/fwlink/?LinkID=135170. At line:1 char:1”
Any help highly appreciated as some custom status setting is becoming critical in current crisis scenarios when one has to work remotely all the time.
Hei, the code is provided as-is and is not signed. In order to run it you need to set the following PowerShell cmdlet: Set-ExecutionPolicy RemoteSigned
Worked like a charm! Thanks!
Is there a way to configure auto reply for chat messages ?
No, unfortunately not
The script works fine for me, until I need to restart Skype for Business. Do you have any ideas how to keep them persistent after a restart?
It is probably your IT that resets your registry settings when you reboot, so it means you need to run the script before use after reboot I would think
Sorry, found the problem myself, there was an error in the script. Needed to change the regkey value 15.0 into 16.0.
Good stuff 👍
I’m not able to find the script for this. Do you know if this has been moved or how I can find this?
Thanks for letting me know, I’ll update with GitHub links👍
Thank you!
Updated 👍