Skype for Business video interoperability is one of two technology barriers we need to tear down to make sure users succeed with Skype in all scenarios. Being able to invite anyone to a Skype for Business conference regardless of vendor is the key to large-scale user adoption. Pexip is one of few vendors that are able to integrate seamless with Skype for Business Server meetings so that anyone can call in to a Skype meeting and join with audio, video and screen sharing both ways.
The other technology barrier is audio interoperability that we can tear down by enabling users for Enterprise Voice, but that is another story. This post is about setting up that first Proof of Concept solution on Hyper-V and be able to make a test call between the systems. The focus is internal setup. How to integrate with a Skype for Business meeting invitations is a separate blog post. Personally, I wanted to learn how to set up Pexip for Skype for Business integration. My experience with Pexip so far is that it is easy to get started with and my goal for this post is to demystify the initial setup experience.

At the end of this post you will be able to validate the setup with the Pexip Test Call Service
I will walk you through the following topics
- What you need to know before you start
- Setting up the management node
- Requesting the certificate
- Setting up the conference node
- Configuring the integration on the Pexip side
- Configuring the integration on the Skye for Business side
- Validate the setup using the Pexip Test Call Service
- Next step actions
What you need to know before you start
- Hyper-V on Windows Server 2012 or later
- VMware, Xen 4,2 and KVM are also supported
- Plan for two internal nodes
- Management node with 2 CPU cores, 100 GB of disk and 4 GB memory
- Conferencing node with 10-12 CPU cores per socket, 1 GB of ram per core and 50 GB disk, it is recommended to have a bit of available capacity (200 GB ++) to do snapshots prior to upgrades etc
- Read more here
- Make sure you have an available NTP server, default suggestion is a public server
- If your Pexip server does not have access to internet, point it to your DC, make sure UDP port 123 is accessible from non-domain joined devices
- Plan DNS names and certificates since it is going to talk to Skype for Business, the Pexip servers need to have certificates from a trusted PKI
- There are web-based tools available on the management node to make the request and import the pem certificates
- you can use the same certificate on the management node and conference node as long as it contains all FQDNs
- The integration requires that the trusted application pool name is the subject name of the certificate, in my setup the following names were used
- pexip.contoso.com, Pexip1.contoso.com, Pexip2.contoso.com, Pexip3.contoso.com, Pexip4.contoso.com
- the Pexip is the poolname, Pexip1 is the management node and Pexip2 is the first conferencing conferencing node
- Pexip3 and Pexip4 is there for future conferencing nodes for high availability
- Make sure you update internal DNS with pexip server names, pool name does not need to be in DNS, but if you want to add it, point it to your conferencing nodes
- You also need a trial license to be able to make and receive calls through the Pexip Conferencing node, you can get a trial license through your Pexip contact
Setting up the management node
- Head over to the Pexip Download page and download the Pexip Infinity Management Node for Microsoft Hyper-V virtual machine
- Before you import the virtual machine, make sure you have a virtual switch you can connect it to that is in the same network as your NTP server or has internet access
- In Hyper-V manager choose import virtual machine and navigate to the location where you extracted the Pexip Management virtual machine, click next and choose all the standard configurations.
- When asked for a virtual switch, choose the one that has access to your NTP server or internet
- After you have successfully imported the machine you are ready to boot it and start configuring it
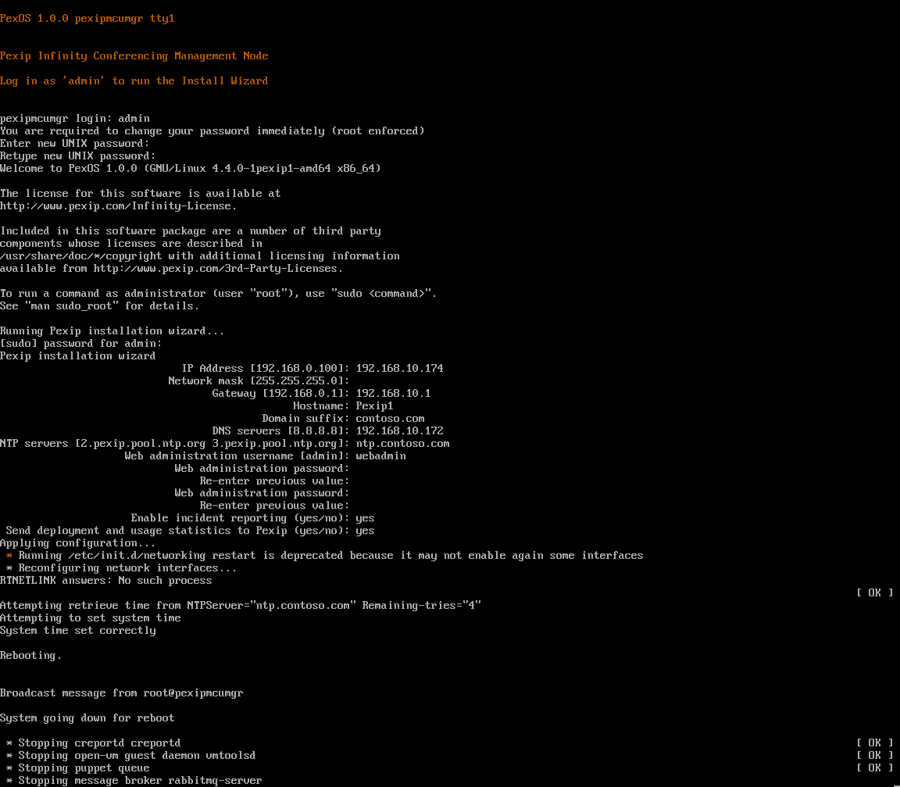
- Booting the VM you will be asked to log in as admin and change the password
- Make sure you take note of the password you specify
- The installation wizard will start and you will be asked to specify IP address and details for your Pexip Management node, I used the following values
- IP Address – 192.168.10.174
- Subnet Mask – 255.255.255.0
- Default Gateway – 192.168.10.1
- Hostname – Pexip1
- Domain – contoso.com
- DNS Servers – 192.168.10.172
- in most cases this will be your internal DNS servers
- NTP Servers – ntp.contoso.com
- This is contoso.com internal ntp server residing on the domain controller
- Web User – username for Web Administrator: web admin
- Web Password – password for the web administrator:
- You will use the web user and password to log in to the management webpage
- When all values are set correctly and the Pexip server can reach the ntp server the installation wizard will finish the setup using the values specified above
- In order to change web user password or name of the management node you will need to rerun the installation wizard and reconfigure the management node from scratch
- The installation will look like this
- When the wizard is finished and the Management Node has rebooted you will be able to log in to the administration website by navigating to https://pexip1.contoso.com or the IP address from a web browser
- Now you are ready to configure the Skype for Business integration, but before that you need to assign a trusted certificate and configure a conferencing node
Requesting the certificate
- The certificate assigned to the internal Pexip servers needs to be trusted by a local or public certificate authority
- In this example I will generate the certificate request from the management node and use the internal PKI solution to generate the certificate
- By importing it back in the Pexip certificate utility you will get the correctly formatted pem certificate with corresponding key
- I am impressed by the simplicity of this tool and it is a great tool to use
- The usual process for creating pem certificates is a mess and this is an easy and straight forward approach
- To request and assign the certificate, the following needs to be done
- Log in to the Pexip web admin
- notice you will get a certificate trust issue the first time you log in
- we will use the certificate we now request to assign to the management node as well and the certificate trust message will go away
- Navigate to Utilities -> Certificate Signing Request and click Add Certificate signing request
-
-
- use pexip.contoso.com as subject name, this is the Skype for Business Trusted Application Pool Name
- Add pexip1.contoso.com, this is our management node
- Specify custom subject alternate name as pexip2.contoso.com, this is the conferencing node we are configuring after we have imported the certificate
- We are also adding pexip3.contoso.com and pexip4.contoso.com so that we can use the same certificate for future conferencing nodes.

-
- Click Save
- Click the newly created request and view the request details
- At the bottom of the page you will see a download button where you can get the request file
- Open it in notepad and copy all the text
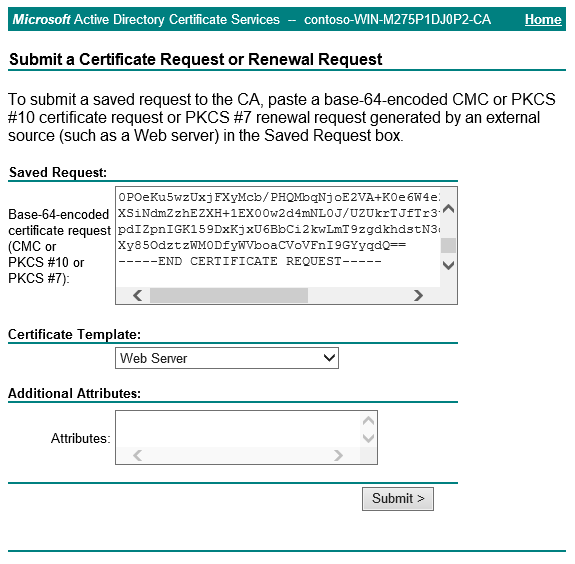
- Navigate to your certificate server request website
- in my case it is https://dc1.contoso.com/certsrv
- Click request certificate -> submit and advanced certificate request -> Submit a certificate request by using….
- Paste your request and choose the appropriate template, typically Web Server
- Download the Base 64 encoded certificate without chain and save your certnew.cer file
- Navigate back to the Pexip certificate signing request
- Import the file at the bottom of the page and confirm that the certificate text is shown in the window as shown below
- Click Complete to finish the certificate request
- Now you have successfully imported the request
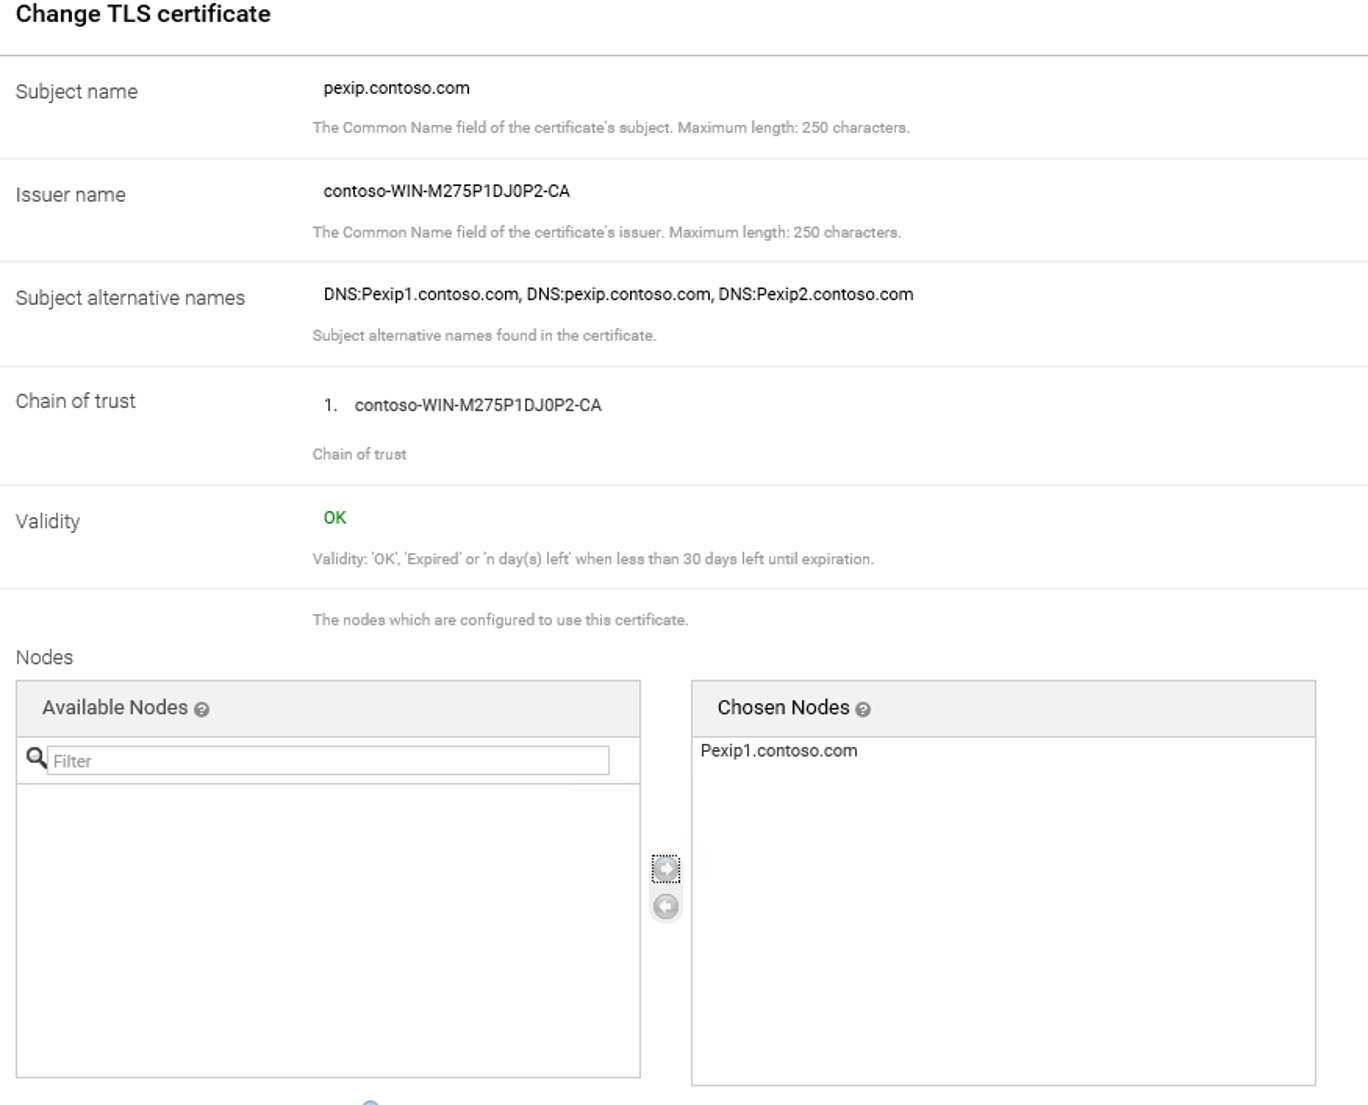
- verify that the status is green OK and that Found 2048 bit RSA key is present and in green
- On this page you can assign the certificate to pexip1.contoso.com and we will use the same certificate and assign it to the conference node we will create in the next section
- Hit Save at the bottom of the page and you have successfully imported and assigned the certificate, no reboot is required
- You also need to make sure the Pexip servers trust the Root CA chain
- To check if it is automatically imported, navigate to Platform Configuration -> Trusted CA certificate and see if the Root CA is assigned
- If it is not you need to navigate to your certificate server request website again
- in my case it is https://dc1.contoso.com/certsrv
- This time click Download a CA certificate, certificate chain, or CRL
- Select Base 64 and click Download CA certificate
- Import the certificate by navigating to Platform Configuration -> Trusted CA certificate in the Pexip web admin
- Log in to the Pexip web admin


Setting up the conference node
- Now you are ready to set up the Pexip Conferencing Node
- This is surprisingly easy, just follow these steps
- Log in to the Pexip Management Node web admin
- Navigate to Platform Configuration -> Conferencing Nodes
- Click Add Conferencing Node
- Select Manual (Hyper-V)
- Use default number of virtual cores and memory
- If you add more cores, make sure you add 1 GB memory per core
- Fill out as shown below, use the certificate we requested earlier containing the pool name which in my case is pexip.contoso.com
- If the pool name is not the subject name of the certificate you will get TLS error when Skype for Business wants to set up a TLS connection to the conferencing node
- You need to specify a system location which is basically what DNS servers to use, I called it MainDC
- Remember to set SIP TLS FQDN. It must be set to the full hostname of this specific conference node, in my case it is pexip2.contoso.com. Make sure you are not inserting the poolname here, as it will cause failure scenarios when adding more conference nodes and a difficult troubleshooting scenario.

- Remember to specify SSH password at the bottom of the page
- Click Finish
- Now you will be able to create the Hyper-V VM with the correct settings, it will get generated on the management node and then you can download it and copy it over to your Hyper-V host and import it
- In order to correctly import the VM you can follow Pexip Director Solutions Architecture, Graham Walsh’s, post on Setting up Pexip Infinity with Microsoft Hyper-V Server 2012
- You can start at Step Nine
- After successfully booting the conferencing node you will see that it connected ok under Status -> Conferencing Nodes


Configuring the integration on the Pexip side
- The Pexip side of the configuration
- Log in to the Pexip Management Node web admin
- Navigate to Platform Configuration -> Global Settings
- Under Connectivity and Pexip Infinity Domain (for Lync / Skype for Business integration) set vc.contoso.com
- which is the domain you are routing from Skype for Business to Pexip and needs to be something different from the SIP domains you have added to your Skype for Business deployment
- Optionally you can check Enable Lync / Skype for Business auto-escalation
- This will answer all calls with video, even though you have called with only voice from the Skype for Business client
- Personally I think it may be confusing for VC Endpoint users to not answer with video, but that is just my thought on the subject
- You should however check Enable Lync / Skype for Business Video-based Screen Sharing (VbSS)
- This enables the ability to do VbSS in calls where Skype for Business is using this, it is always preferred to use VbSS whenever possible, that is why you should alway prioritize screen sharing over application sharing in Skype for Business.
- Read about the advantages with VbSS

- Under Connectivity and Pexip Infinity Domain (for Lync / Skype for Business integration) set vc.contoso.com
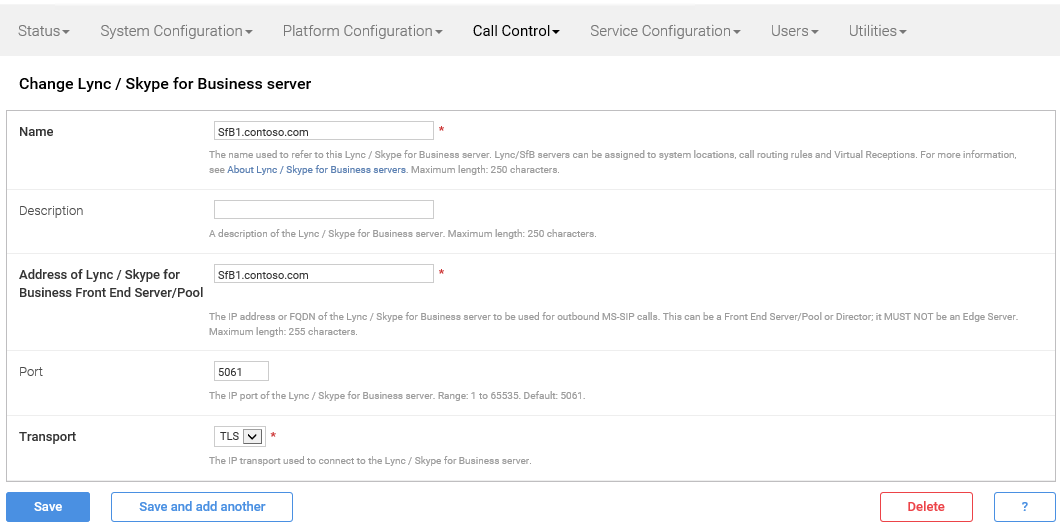
- Navigate to Call Control -> Lync / Skype for Business Servers
- Click Add Lync / Skype for Business server
- Specify the name, Standard Edition Server name or Enterprise Edition Pool name, choose port 5061 and make sure transport is TLS
- Click Save
- Prepare a Pexip Test Call Service for testing purposes
- Navigate to Service Configuration -> Test Call Service
- Click Add Test Call Service
- For basic test purposes you need only define the name and alias
- The alias needs to be a domain other than Skype for Business SIP domains
- A typical example is vc.contoso.com, we will create a static route for this domain in the Skype for Business environment
- In my case the Name is TestCallService and alias is testcallservice@vc.contoso.com
- I also added a second alias just called testcallservice so that VC endpoints can dial that without adding the domain

- Click Save
- Create Call Routing rules
- You need to call routing rules, one for contoso.com being outgoing and one for vc.contoso.com being incoming
- Navigate to Service Configuration -> Call Routing
- Click Add Call Routing Rule
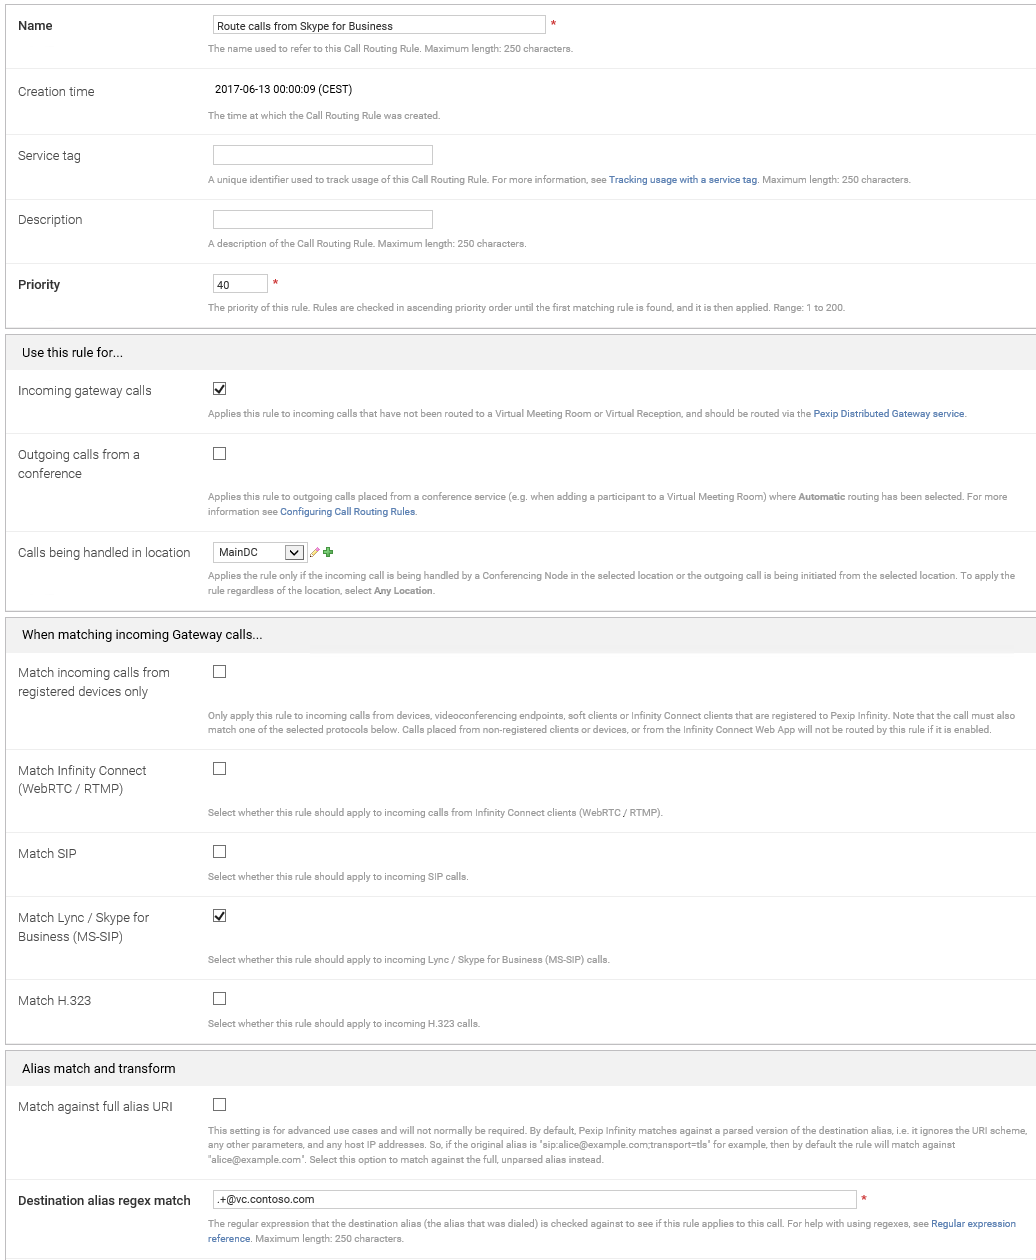
- Name it Route calls from Skype for Business
- Priority 40, this value needs to be unique
- Check incoming gateway calls
- Check Match Lync /Skype for Business (MS-SIP)
- Set Destination alias regex match .+@vc.contoso.com
- Protocol on outgoing call placement should be SIP
- Click Save
- Add another Call Routing rule by clicking Add Call Routing Rule
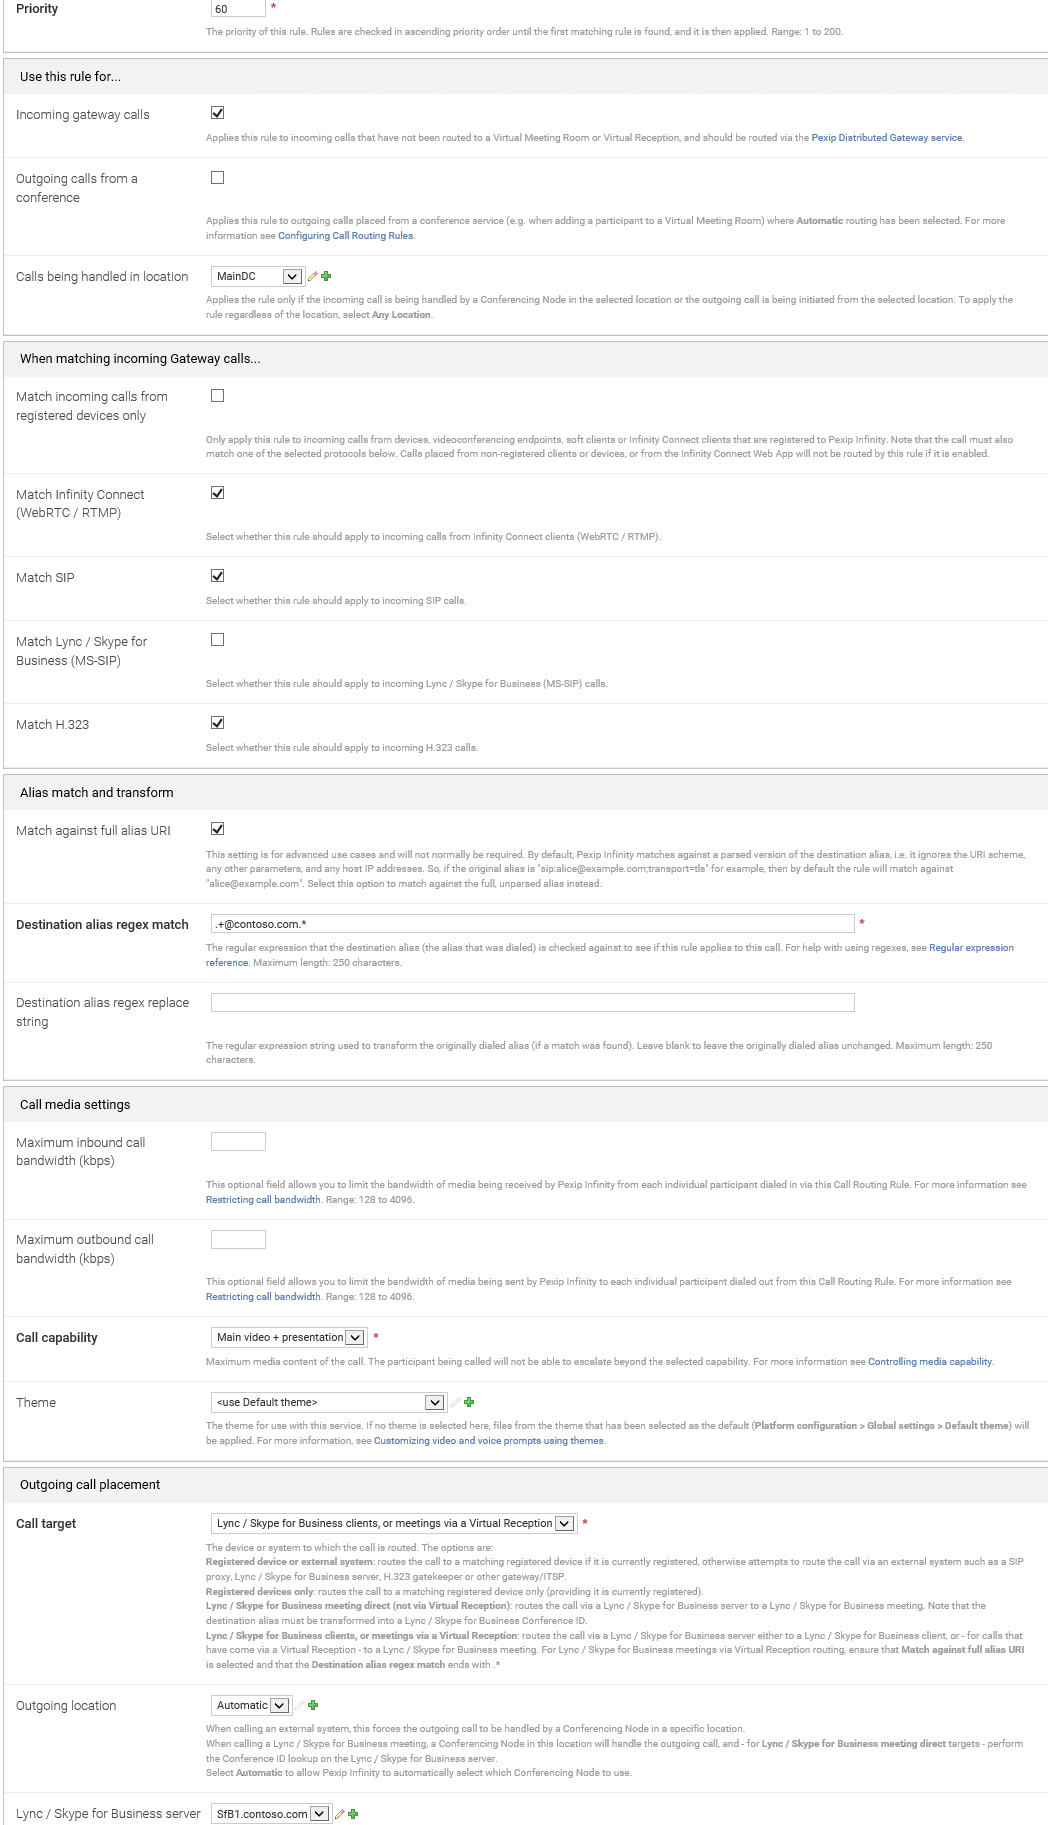
- Name it Route calls to Skype for Business
- Priority 60, this value needs to be unique
- Check incoming gateway calls
- Check Match all other than Lync / Skype for Business
- Check Match against full alias URI
- This is important for the Pexip Virtual Reception to resolve Conferencing ID’s on the Skype for Business server
- Set Destination alias regex match .+@contoso.com.*
- The .* at the end is there for match against aliases that contain parameters after the domain portion and enables the Virtual Receptionist to discover the Conference ID on the Skype for Business server
- Read my post on how to set up Conference ID integration here
- Set Call target to Lync / Skype for Business clients, or meetings via a Virtual Reception
- Set Lync / Skype for Business Server to SfB1.contoso.comClick Save and add another
- The result of the Call Routing configuration should look like this

- Read more here for details
- Add conferencing licenses
- Obtain a license from your Pexip contact
- Navigate to Platform Configuration -> Licensing
- activate the license(es) you have received


Configuring the integration on the Skype for Business side
- The Skype for Business part of the configuration can all be done through PowerShell
- I have created a simple script you can run line by line in order to make sure the configuration is done correct
- To run the configuration, log on to your Skype for Business server where Skype for Business management tools are installed, with a user that is CSsAdministrator
- Run PowerShell ISE as administrator and paste the text below in to the text editor
- in order to copy the text, double-click in the window, select all and copy the plain text
- Make sure you edit the variables with the values that apply to your environment
- Run the lines one by one in your environment
- To get a more detailed explanation, check out the Pexip documentation
break #Just in case you accidentally run the entire script in PowerShell ISE
#Specify the trustedapplication poolname
$TrustedApplicationPoolName = "pexip.contoso.com"
#Specify the Trusted Application name
$TrustedApplicationName = "pexip"
#Specify the conferencing node fqdn
$ConferencingNodeFQDN = "pexip2.contoso.com"
#Specify the static route sip domain, typically vc.domain.com
$StaticRouteSIPDomain = "vc.contoso.com"
#Find and create a variable for the registrar you want to add the pexip integration for
Get-CsService -Registrar | ft identity
#create the variable
$RegistrarFQDN = "SfB1.contoso.com"

#Create the trusted applicationpool where you can add multiple conferencing nodes
New-CsTrustedApplicationPool -Identity $TrustedApplicationPoolName -ComputerFqdn $ConferencingNodeFQDN -Registrar $RegistrarFQDN -Site 1 -RequiresReplication $false -ThrottleAsServer $true -TreatAsAuthenticated $true
#To add more nodes, use the below syntax
New-CsTrustedApplicationComputer -Identity pexip3.contoso.com -Pool pexip.contoso.com
#Add the trusted application to the trustedapplication pool
New-CsTrustedApplication -Applicationid $TrustedApplicationName -TrustedApplicationPoolFqdn $TrustedApplicationPoolName -Port 5061
#In order to tell Skype for Business where to route SIP traffic for Pexip conference calls, you need to create a static route for our vc domain
#use Get-CsStaticRoutingConfiguration to check if there are existing static routes added,
Get-CsStaticRoutingConfiguration
#if no existing routes are found use the New-CsStaticRoutingConfiguration to create static route, if it does exist, skip thenNew-CsStaticRoutingConfiguration cmdlet
New-CsStaticRoutingConfiguration -Identity "Service:Registrar:$RegistrarFQDN"
$route = New-CsStaticRoute -TLSRoute -Destination $TrustedApplicationPoolName -Port 5061 -MatchUri "$StaticRouteSIPDomain" -UseDefaultCertificate $true
Set-CsStaticRoutingConfiguration -Identity "Service:Registrar:$RegistrarFQDN" -Route @{Add=$route}
#Enable the new configuration
Enable-CsTopology
#Check the Trusted Application Pool configuration
Get-CsTrustedApplicationPool
#Check the Trusted Application Computer
Get-CsTrustedApplicationComputer
- Now you are ready to make test calls
Validate the setup using the Pexip Test Call Service
- The goal of this blog post is to help you get the basic Skype for Business and Pexip integration set up correct
- We will validate the configuration by making a test call from the Test Call Service testcallservice@vc.contoso.com to a Skype for Business user and we will make sure we can add the meeting room to a Skype for Business contact list and see that it resolves presence and are able to call the meeting room
- To make a call from the Pexip Test Call Service
- Log in to the Pexip Management Node web admin
- Navigate to Service Configuration -> Test Call Service
- Click the VMR we created earlier called TestCallService
- At the bottom of the page you click Dial out to participant
- Specify Participant alias to be the sip address you are logged in with using your Skype for Business client.
- I am logged in with adrianl@contoso.com
- On Protocol, specify Lync / Skype for Business (MS-SIP)
- Since we have only set up and internal solution, no firewalls should block the path between the client and the Pexip Conferencing node
- Click Dial out to participant and you should receive the call from Pexip on your Skype for Business client, answer using video and verify that you are able to connect and can hear and see yourself with a 2 second delay
- You will get an incoming call from TestCallService
- Specify Participant alias to be the sip address you are logged in with using your Skype for Business client.
- Answer it and make sure you can hear the service asking you to count to three and that you can hear yourself with a two second delay
- To make a call from a Skype for Business client
- Search for and add testcallservice@vc.contoso.com to your contact list
- Verify that it resolves the name of the room and presence
- Make a video call and verify that you connect ok to the Pexip Test Call Service and that you can hear yourself with a two second delay


Congratulations! You have now set up a basic Pexip setup with your Skype for Business deployment. This is all there is to it, but of course there is more that needs to be done in order to have a fully integrated video interoperability service. Check out my post on how to integrate Pexip with Skype for Business meetings. There you will learn how to complete Skype for Business and Pexip integration with the ability to join Skype for Business meeting from any video system either directly or via a Pexip Virtual Receptionist.
Next Steps
- Most of the next steps are well documented at http://docs.pexip.com
- Typical next steps are
