My thoughts on Pexip getting certified for Skype for Business

This is good news! The certification process validates the seamless way Pexip Infinity Fusion integrates with Skype for Business Server 2015 meetings. Pexip has the ability to integrate video endpoints seamless in to Skype for Business meetings so that anyone from any device can call in to a the meeting and join with audio, video and screen sharing both ways.

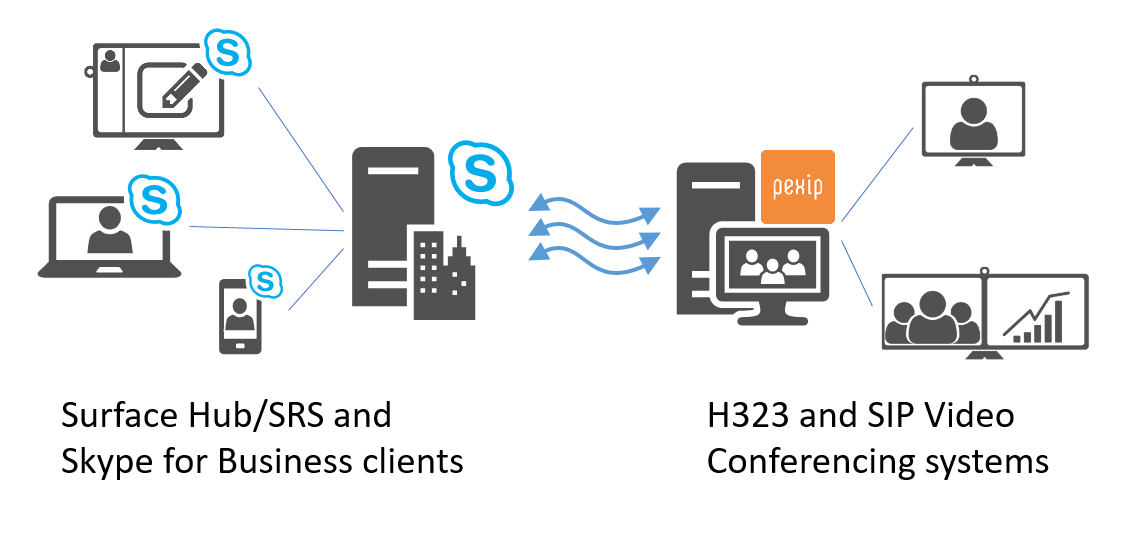
The Pexip and Skype for Business integration explained in one picture

Why the certification at this point?

Personally I see a lot of enterprise customers moving to Skype for Business Server for VoIP and meetings including moving their telephone conferencing solution. If the enterprise has video endpoints from other vendors the end-user story becomes complex. The goal is always to have as few options as possible when it comes to how to do meetings to ensure widespread adoption. Pexip helps with this story and they can even register endpoints directly which helps the enterprise decommission older outdated and complex video servers and still keep the meeting room investments. Another reason for this move by Microsoft is probably that Cisco has a good video interoperability story with their acquisition of Acano that happened in 2016. Also their own offering, the Video Interoperability Server (VIS) that was introduced with Lync Server 2013, has not seen much development since it’s release. The VIS role has the limitation that it only works with certain Cisco endpoints and only with internal endpoints without any firewall between the endpoints and Skype for Business Servers.

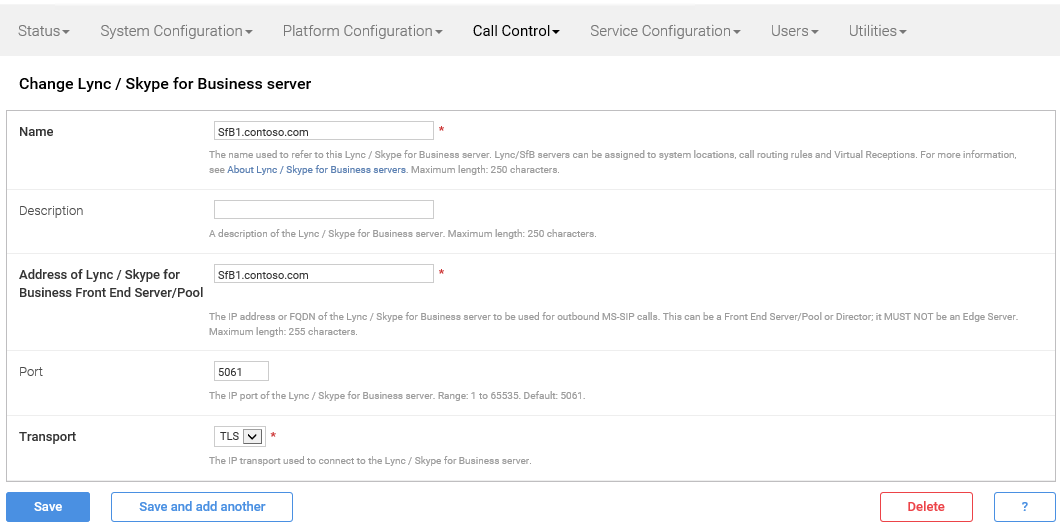
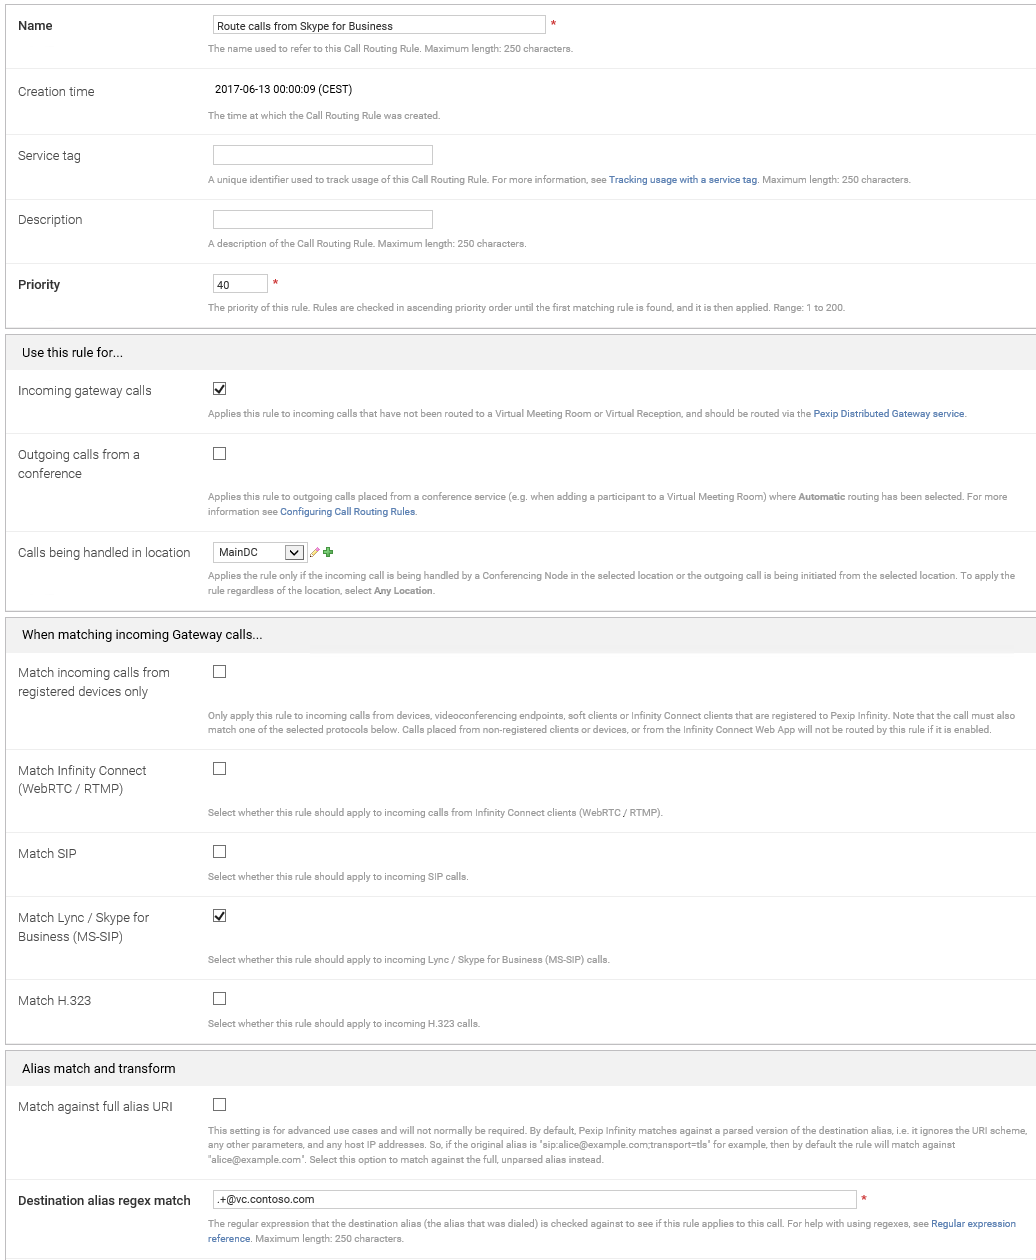
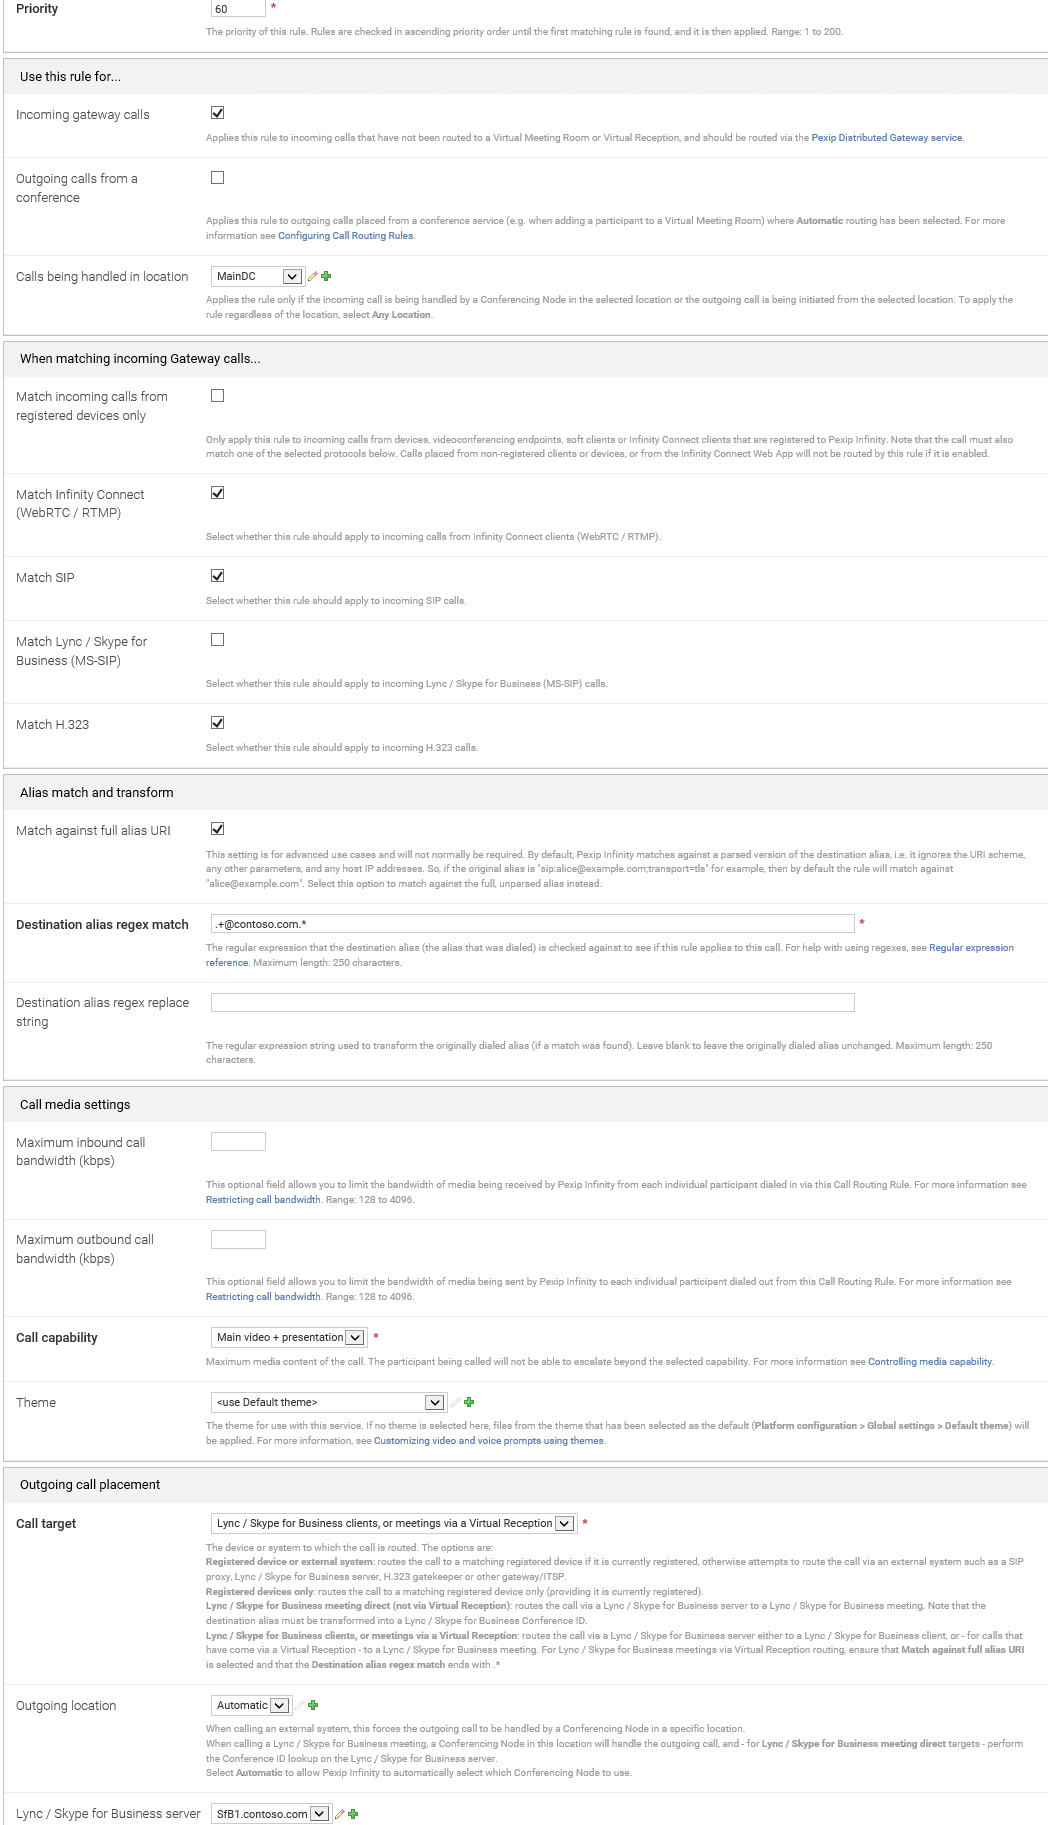
What does the integration look like?

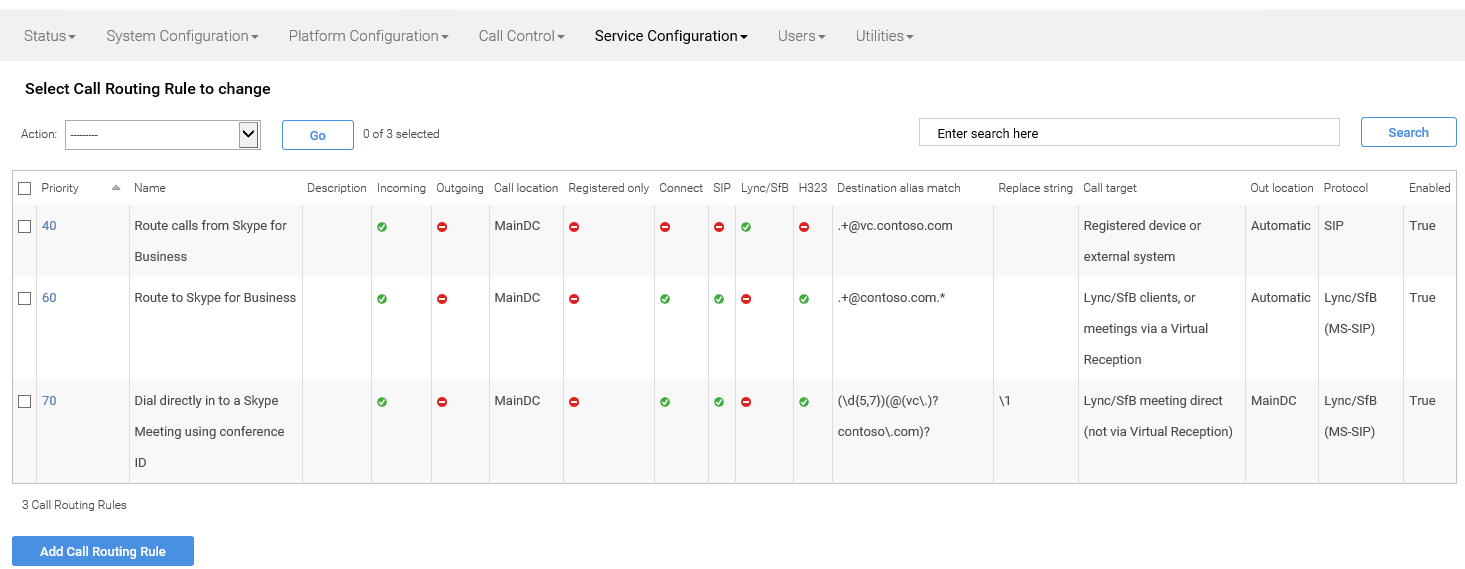
From a video endpoint that is internally registered on separate video servers or directly to Pexip, all they have to do to join the Skype for Business meeting is dial the Skype for Business meeting conferencing ID and join directly in to the meeting. For external endpoints that is not registered to any local video servers, they need to dial skype@domain.com and type the conference ID when prompted to join the meeting. To learn more about the capabilities and setup process read my blog post on the subject

How it looks like when a Pexip registered endpoint joines a Skype for Business meeting, from my blogpost on how to set it up

Why this has a big impact for customers

A lot of enterprises moving to Skype for Business has an existing investment in video based meeting rooms. In my design process I always ask what their meeting rooms look like and what kind of equipment are being used. Many larger organization has many vendors for video and audio in their meeting rooms and are not ready to replace all that technology with Skype for Business based equipment. The Pexip integration helps them capitalize on the investment already made and still succeed with Skype for Business. This helps with flexibility when designing future meeting rooms and ends the technology debate regarding what vendor is best. You can have the best of both worlds and remove the technology barrier for meetings.

What does the certification entail?

Here is what Microsoft writes about the certification process “The Skype for Business Certification Program is designed to offer Microsoft customers badges or designations as indicators of third party solutions that demonstrate a high quality experience and compatibility when used with Skype for Business. Only products that pass the specifications outlined in the Skype for Business Certification Program can be associated with each designation. Specifications are designed specific to each category based on, but not exclusive to, industry standards, enterprise class solutions, functional interop or audio/video quality. All vendors participating in Skype for Business Certification Program participate in common support infrastructure (TSANet) for rapid resolution of support tickets.”  Read more here

In short, it means both Microsoft and Pexip has tested, adjusted and validated the integration and that both parties support the solution and will work together to resolve any unforseen issues. This is good news for customers and partners that use and work with both Microsoft and Pexip.

To sum it up

Pexip is now supported by Microsoft when integrating with Skype for Business meetings. This is good news for customers because they can now easier choose best of both worlds when designing meeting room experience. Removing the meeting technology barrier results in widespread adoption in the enterprise. The focus of this certification is clearly Skype for Business Server meeting integration for enterprises. Pexip has other capabilities such as support for hybrid topology, distributed meeting across servers in a global environment and scale-out capacity using Azure. I am looking forward to see how this relationship develops and working with helping enterprises succeed with Skype for Business user adoption in all scenarios.

References

How to Integrate Pexip with Skype for Business meetings

Skype for Business video interoperability is one of two technology barriers we need to tear down to make sure users succeed with Skype in all scenarios. Being able to invite anyone to a Skype for Business conference regardless of vendor is the key to large-scale user adoption. Pexip is one of few vendors that are able to integrate seamlessly with Skype for Business Server meetings so that anyone can call in to a Skype meeting and join with audio, video and screen sharing both ways.

In this post I will show you how to configure Pexip to integrate with Skype for Business meetings and how to test using the Pexip Infinity Connect soft-client. The goal is to have the ability to join a Skype for Business meeting with any VC Endpoint by using the Skype for Business dial-in conference ID. Read more about what features you can expect from Pexip. Here is how you do it

At the end of this post you will be able to join a Skype for Business meeting from any endpoint

You are about to learn how to do the following

  • Make sure you read my previous blog post on What you need to know to get started with a Skype for Business and Pexip PoC where I explain how to set up the Pexip servers and enable a simple test call between Pexip and Skype for Business
  • Configure direct registration of a VC Endpoint to Pexip
  • Create a new Call Routing rule for the ability to dial the Skype Conference ID directly
  • Create a Virtual Receptionist for the ability use a fixed alias to join meetings
  • Create a dial-in conferencing number and adjust the Skype meeting invitation
  • Validate the configuration by dialing in to a meeting from the Pexip Infinity Connect client
  • Next Steps

Configure direct registration of a VC Endpoint to Pexip

  • Log on to the management node web admin site
  • Navigate to Service Configuration -> Device Aliases
      • Device alias could be PexipUser@vc.contoso.com
        • vc.contoso.com is my video conferencing domain
        • My Skype for Business SIP domain is contoso.com
      • Leave the rest blank and delete the password, in that way you will not get challenged with a username and password when registering
      • Click Add Device alias
  • Click Save
  • Now we have created a user for our test client
  • next we will need to create a new call route

Create a new Call Routing rule for the ability to dial the Skype Conference ID directly

  • Navigate to Service Configuration -> Call Routing rule
  • Click Add Call Routing Rule
    • Name is Dial directly in to a Skype Meeting using conference ID
    • Priority needs to be unique and set it to 70
    • Set When Matching incoming Gateway calls to all except Lync / Skype for Business
    • Set Destination alias regex match to: (\d{5,7})(@(vc\.)?contoso\.com)?
      • This assumes your SfB Conference ID is between 5 and 7 digits, modify 5,7 to fit the lengths of your Conference IDs.
    • Set Destination alias regex replace string to: \1
    • Set Call target to Lync / Skype for Business Meeting direct (not via Virtual Reception)
      • This allows the routing rule to resolve the Conference ID to a meeting URI and connect to it directly
    • I set the Outgoing location to my primary site, MainDC
    • Make sure the correct Lync / Skype for Business server is chosen
      • in my case it is my Standard Edition server called SfB1.contoso.com
    • Click Save
    • The result of the Call Routing configuration should look like this

Create a Virtual Receptionist for the ability use a fixed alias to join meetings

  • Navigate to Service Configuration -> Virtual Reception
  • Click Add Virtual Reception
    • Name: Contoso Skype Meeting Reception
    • Show Advanced options
      • Lync/Skype for Business server: SfB1.contoso.com
        • your Skype for Business server, in my case it is the SfB1.contoso.com standard edition server
      • Lync / Skype for Business meeting lookup location: MainDC
        • The Pexip location where your Skype integrated conferencing node resides, in my case it is MainDC
    • Aliases (Typically add a few options for aliases as VC endpoints might be able to dial different things)
      • Alias1: skype@vc.contoso.com
      • Alias2: skype@contoso.com
        • in case someone types just contoso.com from a VC Endpoint
      • Alias3: skype
        • In case someone wants to just type Skype from a VC Endpoint
  • Click Save
  • Now, let’s validate the Skype for Business requirements for this to work

Create a dial-in conferencing number and adjust the Skype meeting invitation

  • On the Skype for Business Server, open Skype for Business Control Panel
  • Navigate to Conferencing -> Dial-In Access Number
    • If you have a dial-in access number already you are all set
    • If you do not have a dial-in access number and you do not have a SIP trunk integration, you can use a dummy number
      • The reason for needing the dial-in access numbers is that it will generate a conference ID with each meeting invite, this is the ID that Pexip will use to join the conference
      • Click New
        • In Display Number, type the phone number as you want it to be displayed in the meeting invitation
          • in my case it is +4721402075
        • Display name, is typically the location or country where this number is homed
          • In my case it is Norway
        • Line URI, is the actual number formatted as a line uri
          • in my case it is tel:+4721402075
        • SIP Uri should be a name and domain for the dial-in access number
          • in my case it is sip:Norway@contoso.com
        • Pool is where the number is homed, this applies if you have multiple pools
        • Choose Primary language and secondary language
        • Choose the region the number is the primary number for, in my case it is Norway
          • If you cannot find a region here, you need to add one before you can create a dial-in access number
          • You can add one by going to Voice Routing -> Dial Plan, click on Global and write a name for your region in the region field
            • If you do not want to modify Global you can either create a Site, Pool or User dialpan.
            • User dialplan needs be added manually to users.
        • Now you are ready to create and save the dial-in access number
      • Click Commit
  • Now, let’s add some text to the meeting invite to reflect the ability to join from a VC Endpoint
  • Navigate to Conferencing -> Meeting Configuration
    • Edit Global or create a new Site or Pool configuration
      • A meeting configuration will apply to all users within pool, site or global
      • In the Custom footer text type an appropriate text to reflect the Pexip integration
        • Example: To join the meeting from a Contoso video endpoint, just dial the Conference ID. To join the meeting as an external video endpoint participant use skype@vc.contoso.com and enter the Conference ID when prompted
      • If you want to change the logo url, the link needs to hosted on a public site and the size should be a gif or jpg and the maximum size of the image should be 30 pixels high by 188 pixels wide for best result
    • Click Commit
  • Now you are ready to validate the meeting join experience

Validate the configuration by dialing in to a meeting from the Pexip Infinity Connect client

  • Download the Pexip Infinity Connect client and install it
  • Click the cogwheel and type your name and scroll down to registration
    • Sign in using pexipuser@vc.contoso.com or the Device User you created
    • Server address is the IP address or FQDN to your Pexip Conferencing node
      • In my case it is pexip2.contoso.com
    • leave username and password blank as we did not specify that when creating the Device alias
    • Click Register and ok to exit the setup
  • We are going to do three tests
    1. Type testcallservice@vc.contoso.com and call the Pexip Test Call Service
      • This is a service I created in my initial setup blog post found here
      • Verify that you are able to resolve it, call it and have it play back your sound with a two second delay
    2. Call in to a Skype meeting using the Virtual Reception user we created
      • First, log on using Skype for Business and create a ad-hoc meeting
        • You can do that by clicking the cogwheel drop down in the client
        • Click Meet Now
        • When joining the meeting with your Skype for Business client, click the three dotted button and click Meeting Entry Info
        • There you will see the Conference ID for that call
      • Go back to the Pexip Infinity Client
        • Type skype@vc.contoso.com, see that it resolves presence and dial it
        • When prompted for the Lync Conference ID, type the one from the Skype meeting
          • in my case it is 11127
        • Click connect and see that you are joining the Skype for Business meeting and notice that you are joining as Pexip User and not as a Pexip conference
      • This is great stuff and it means that the Virtual Reception user we created works and that the Call Routing rule with the .+@contoso.com.* regex rule is working.
      • But there is one more thing we can test
    3. Call in to a Skype meeting by dialing directly using the Conference ID
      • This is possible for internal VC Endpoints
      • Close down any existing calls on the Pexip Infinity Client
      • In the Pexip client type the conference ID
        • In my case it is 11127
      • Call using video and verify that you are able to join the meeting directly as Pexip User
      • When this scenario succeeds it means that the Call Routing rule with (\d{5,7})(@(vc\.)?contoso\.com)? regex rule worked
    4. Celebrate that your Skype for Business meeting integration with Pexip works
      • As a bonus, you should of course be able to dial the Skype user directly from the Pexip User by using the Skype sip address and the other way around

It is always #GoodTimes when you are able to validate a new deployment

Congratulations! You have now set up a fully integrated Skype for Business and Pexip deployment. This is all there is to it and a basic video interoperability service is now in place. Your Skype for Business adoption is a key ingredient for success and there is one less blocker for widespread use of Skype in your organization. Check out the next steps below for configuring Pexip to work with external and federated traffic and how to integrate Pexip with other video systems

Next Steps

What you need to know to get started with a Skype for Business and Pexip PoC

Skype for Business video interoperability is one of two technology barriers we need to tear down to make sure users succeed with Skype in all scenarios. Being able to invite anyone to a Skype for Business conference regardless of vendor is the key to large-scale user adoption. Pexip is one of few vendors that are able to integrate seamless with Skype for Business Server meetings so that anyone can call in to a Skype meeting and join with audio, video and screen sharing both ways.

The other technology barrier is audio interoperability that we can tear down by enabling users for Enterprise Voice, but that is another story. This post is about setting up that first Proof of Concept solution on Hyper-V and be able to make a test call between the systems. The focus is internal setup. How to integrate with a Skype for Business meeting invitations is a separate blog post. Personally, I wanted to learn how to set up Pexip for Skype for Business integration. My experience with Pexip so far is that it is easy to get started with and my goal for this post is to demystify the initial setup experience.

At the end of this post you will be able to validate the setup with the Pexip Test Call Service

I will walk you through the following topics

  • What you need to know before you start
  • Setting up the management node
  • Requesting the certificate
  • Setting up the conference node
  • Configuring the integration on the Pexip side
  • Configuring the integration on the Skye for Business side
  • Validate the setup using the Pexip Test Call Service
  • Next step actions

What you need to know before you start

  • Hyper-V on Windows Server 2012 or later
    • VMware, Xen 4,2 and KVM are also supported
  • Plan for two internal nodes
    • Management node with 2 CPU cores, 100 GB of disk and 4 GB memory
    • Conferencing node with 10-12 CPU cores per socket, 1 GB of ram per core and 50 GB disk, it is recommended to have a bit of available capacity (200 GB ++) to do snapshots prior to upgrades etc
    • Read more here
  • Make sure you have an available NTP server, default suggestion is a public server
    • If your Pexip server does not have access to internet, point it to your DC, make sure UDP port 123 is accessible from non-domain joined devices
  • Plan DNS names and certificates since it is going to talk to Skype for Business, the Pexip servers need to have certificates from a trusted PKI
    • There are web-based tools available on the management node to make the request and import the pem certificates
    • you can use the same certificate on the management node and conference node as long as it contains all FQDNs
      • The integration requires that the trusted application pool name is the subject name of the certificate, in my setup the following names were used
      • pexip.contoso.com, Pexip1.contoso.com, Pexip2.contoso.com, Pexip3.contoso.com, Pexip4.contoso.com
      • the Pexip is the poolname, Pexip1 is the management node and Pexip2 is the first conferencing conferencing node
        • Pexip3 and Pexip4 is there for future conferencing nodes for high availability
    • Make sure you update internal DNS with pexip server names, pool name does not need to be in DNS, but if you want to add it, point it to your conferencing nodes
  • You also need a trial license to be able to make and receive calls through the Pexip Conferencing node, you can get a trial license through your Pexip contact

Setting up the management node

  • Head over to the Pexip Download page and download the Pexip Infinity Management Node for Microsoft Hyper-V virtual machine
  • Before you import the virtual machine, make sure you have a virtual switch you can connect it to that is in the same network as your NTP server or has internet access
  • In Hyper-V manager choose import virtual machine and navigate to the location where you extracted the Pexip Management virtual machine, click next and choose all the standard configurations.
    • When asked for a virtual switch, choose the one that has access to your NTP server or internet
  • After you have successfully imported the machine you are ready to boot it and start configuring it
  • Booting the VM you will be asked to log in as admin and change the password
    • Make sure you take note of the password you specify
  • The installation wizard will start and you will be asked to specify IP address and details for your Pexip Management node, I used the following values
    • IP Address – 192.168.10.174
    • Subnet Mask – 255.255.255.0
    • Default Gateway – 192.168.10.1
    • Hostname – Pexip1
    • Domain – contoso.com
    • DNS Servers – 192.168.10.172
      • in most cases this will be your internal DNS servers
    • NTP Servers – ntp.contoso.com
      • This is contoso.com internal ntp server residing on the domain controller
    • Web User – username for Web Administrator: web admin
    • Web Password – password for the web administrator:
      • You will use the web user and password to log in to the management webpage
    • When all values are set correctly and the Pexip server can reach the ntp server the installation wizard will finish the setup using the values specified above
      • In order to change web user password or name of the management node you will need to rerun the installation wizard and reconfigure the management node from scratch
      • The installation will look like this
  • When the wizard is finished and the Management Node has rebooted you will be able to log in to the administration website by navigating to https://pexip1.contoso.com or the IP address from a web browser
    • Now you are ready to configure the Skype for Business integration, but before that you need to assign a trusted certificate and configure a conferencing node

Requesting the certificate

  • The certificate assigned to the internal Pexip servers needs to be trusted by a local or public certificate authority
  • In this example I will generate the certificate request from the management node and use the internal PKI solution to generate the certificate
  • By importing it back in the Pexip certificate utility you will get the correctly formatted pem certificate with corresponding key
    • I am impressed by the simplicity of this tool and it is a great tool to use
    • The usual process for creating pem certificates is a mess and this is an easy and straight forward approach
  • To request and assign the certificate, the following needs to be done
    • Log in to the Pexip web admin
      • notice you will get a certificate trust issue the first time you log in
      • we will use the certificate we now request to assign to the management node as well and the certificate trust message will go away
    • Navigate to Utilities -> Certificate Signing Request and click Add Certificate signing request
        • use pexip.contoso.com as subject name, this is the Skype for Business Trusted Application Pool Name
        • Add pexip1.contoso.com, this is our management node
        • Specify custom subject alternate name as pexip2.contoso.com, this is the conferencing node we are configuring after we have imported the certificate
        • We are also adding pexip3.contoso.com and pexip4.contoso.com so that we can use the same certificate for future conferencing nodes.
    • Click Save
    • Click the newly created request and view the request details
    • At the bottom of the page you will see a download button where you can get the request file
    • Open it in notepad and copy all the text
    • Navigate to your certificate server request website
    • Click request certificate -> submit and advanced certificate request -> Submit a certificate request by using….
    • Paste your request and choose the appropriate template, typically Web Server
    • Download the Base 64 encoded certificate without chain and save your certnew.cer file
    • Navigate back to the Pexip certificate signing request
    • Import the file at the bottom of the page and confirm that the certificate text is shown in the window as shown below
    • Click Complete to finish the certificate request
    • Now you have successfully imported the request
      • verify that the status is green OK and that Found 2048 bit RSA key is present and in green
    • On this page you can assign the certificate to pexip1.contoso.com and we will use the same certificate and assign it to the conference node we will create in the next section
    • Hit Save at the bottom of the page and you have successfully imported and assigned the certificate, no reboot is required
    • You also need to make sure the Pexip servers trust the Root CA chain
      • To check if it is automatically imported, navigate to Platform Configuration -> Trusted CA certificate and see if the Root CA is assigned
      • If it is not you need to navigate to your certificate server request website again
      • This time click Download a CA certificate, certificate chain, or CRL
      • Select Base 64 and click Download CA certificate
      • Import the certificate by navigating to Platform Configuration -> Trusted CA certificate in the Pexip web admin

Setting up the conference node

  • Now you are ready to set up the Pexip Conferencing Node
  • This is surprisingly easy, just follow these steps
    • Log in to the Pexip Management Node web admin
    • Navigate to Platform Configuration -> Conferencing Nodes
    • Click Add Conferencing Node
    • Select Manual (Hyper-V)
    • Use default number of virtual cores and memory
      • If you add more cores, make sure you add 1 GB memory per core
    • Fill out as shown below, use the certificate we requested earlier containing the pool name which in my case is pexip.contoso.com
      • If the pool name is not the subject name of the certificate you will get TLS error when Skype for Business wants to set up a TLS connection to the conferencing node
      • You need to specify a system location which is basically what DNS servers to use, I called it MainDC
      • Remember to set SIP TLS FQDN. It must be set to the full hostname of this specific conference node, in my case it is pexip2.contoso.com. Make sure you are not inserting the poolname here, as it will cause failure scenarios when adding more conference nodes and a difficult troubleshooting scenario.
    • Remember to specify SSH password at the bottom of the page
    • Click Finish
    • Now you will be able to create the Hyper-V VM with the correct settings, it will get generated on the management node and then you can download it and copy it over to your Hyper-V host and import it
    • In order to correctly import the VM you can follow Pexip Director Solutions Architecture, Graham Walsh’s, post on Setting up Pexip Infinity with Microsoft Hyper-V Server 2012
    • You can start at Step Nine
    • After successfully booting the conferencing node you will see that it connected ok under Status -> Conferencing Nodes

Configuring the integration on the Pexip side

  • The Pexip side of the configuration
    • Log in to the Pexip Management Node web admin
    • Navigate to Platform Configuration -> Global Settings
      • Under Connectivity and Pexip Infinity Domain (for Lync / Skype for Business integration) set vc.contoso.com
        • which is the domain you are routing from Skype for Business to Pexip and needs to be something different from the SIP domains you have added to your Skype for Business deployment
      • Optionally you can check Enable Lync / Skype for Business auto-escalation
        • This will answer all calls with video, even though you have called with only voice from the Skype for Business client
        • Personally I think it may be confusing for VC Endpoint users to not answer with video, but that is just my thought on the subject
      • You should however check Enable Lync / Skype for Business Video-based Screen Sharing (VbSS)
        • This enables the ability to do VbSS in calls where Skype for Business is using this, it is always preferred to use VbSS whenever possible, that is why you should alway prioritize screen sharing over application sharing in Skype for Business.
        • Read about the advantages with VbSS
    • Navigate to Call Control -> Lync / Skype for Business Servers
      • Click Add Lync / Skype for Business server
      • Specify the name, Standard Edition Server name or Enterprise Edition Pool name, choose port 5061 and make sure transport is TLS
      • Click Save
    • Prepare a Pexip Test Call Service for testing purposes
      • Navigate to Service Configuration -> Test Call Service
      • Click Add Test Call Service
      • For basic test purposes you need only define the name and alias
        • The alias needs to be a domain other than Skype for Business SIP domains
        • A typical example is vc.contoso.com, we will create a static route for this domain in the Skype for Business environment
        • In my case the Name is TestCallService and alias is testcallservice@vc.contoso.com
          • I also added a second alias just called testcallservice so that VC endpoints can dial that without adding the domain
      • Click Save
    • Create Call Routing rules
      • You need to call routing rules, one for contoso.com being outgoing and one for vc.contoso.com being incoming
      • Navigate to Service Configuration -> Call Routing
      • Click Add Call Routing Rule
        • Name it Route calls from Skype for Business
        • Priority 40, this value needs to be unique
        • Check incoming gateway calls
        • Check Match Lync /Skype for Business (MS-SIP)
        • Set Destination alias regex match .+@vc.contoso.com
        • Protocol on outgoing call placement should be SIP
        • Click Save
      • Add another Call Routing rule by clicking Add Call Routing Rule
        • Name it Route calls to Skype for Business
        • Priority 60, this value needs to be unique
        • Check incoming gateway calls
        • Check Match all other than Lync / Skype for Business
        • Check Match against full alias URI
          • This is important for the Pexip Virtual Reception to resolve Conferencing ID’s on the Skype for Business server
        • Set Destination alias regex match .+@contoso.com.*
          • The .* at the end is there for match against aliases that contain parameters after the domain portion and enables the Virtual Receptionist to discover the Conference ID on the Skype for Business server
          • Read my post on how to set up Conference ID integration here
        • Set Call target to Lync / Skype for Business clients, or meetings via a Virtual Reception
        • Set Lync / Skype for Business Server to SfB1.contoso.comClick Save and add another
    • The result of the Call Routing configuration should look like this
    • Add conferencing licenses
      • Obtain a license from your Pexip contact
      • Navigate to Platform Configuration -> Licensing
      • activate the license(es) you have received

Configuring the integration on the Skype for Business side

  • The Skype for Business part of the configuration can all be done through PowerShell
    • I have created a simple script you can run line by line in order to make sure the configuration is done correct
    • To run the configuration, log on to your Skype for Business server where Skype for Business management tools are installed, with a user that is CSsAdministrator
    • Run PowerShell ISE as administrator and paste the text below in to the text editor
      • in order to copy the text, double-click in the window, select all and copy the plain text
      • Make sure you edit the variables with the values that apply to your environment
    • Run the lines one by one in your environment
    • To get a more detailed explanation, check out the Pexip documentation
break #Just in case you accidentally run the entire script in PowerShell ISE
#Specify the trustedapplication poolname
$TrustedApplicationPoolName = "pexip.contoso.com"
#Specify the Trusted Application name
$TrustedApplicationName = "pexip"
#Specify the conferencing node fqdn
$ConferencingNodeFQDN = "pexip2.contoso.com"
#Specify the static route sip domain, typically vc.domain.com
$StaticRouteSIPDomain = "vc.contoso.com"
#Find and create a variable for the registrar you want to add the pexip integration for
Get-CsService -Registrar | ft identity
#create the variable
$RegistrarFQDN = "SfB1.contoso.com"

#Create the trusted applicationpool where you can add multiple conferencing nodes
New-CsTrustedApplicationPool -Identity $TrustedApplicationPoolName -ComputerFqdn $ConferencingNodeFQDN -Registrar $RegistrarFQDN -Site 1 -RequiresReplication $false -ThrottleAsServer $true -TreatAsAuthenticated $true
#To add more nodes, use the below syntax
New-CsTrustedApplicationComputer -Identity pexip3.contoso.com -Pool pexip.contoso.com
#Add the trusted application to the trustedapplication pool
New-CsTrustedApplication -Applicationid $TrustedApplicationName -TrustedApplicationPoolFqdn $TrustedApplicationPoolName -Port 5061
#In order to tell Skype for Business where to route SIP traffic for Pexip conference calls, you need to create a static route for our vc domain
#use Get-CsStaticRoutingConfiguration to check if there are existing static routes added, 
Get-CsStaticRoutingConfiguration
#if no existing routes are found use the New-CsStaticRoutingConfiguration to create static route, if it does exist, skip thenNew-CsStaticRoutingConfiguration cmdlet
New-CsStaticRoutingConfiguration -Identity "Service:Registrar:$RegistrarFQDN"
$route = New-CsStaticRoute -TLSRoute -Destination $TrustedApplicationPoolName -Port 5061 -MatchUri "$StaticRouteSIPDomain" -UseDefaultCertificate $true
Set-CsStaticRoutingConfiguration -Identity "Service:Registrar:$RegistrarFQDN" -Route @{Add=$route}
#Enable the new configuration
Enable-CsTopology
#Check the Trusted Application Pool configuration
Get-CsTrustedApplicationPool
#Check the Trusted Application Computer
Get-CsTrustedApplicationComputer
  • Now you are ready to make test calls

Validate the setup using the Pexip Test Call Service

  • The goal of this blog post is to help you get the basic Skype for Business and Pexip integration set up correct
  • We will validate the configuration by making a test call from the Test Call Service testcallservice@vc.contoso.com to a Skype for Business user and we will make sure we can add the meeting room to a Skype for Business contact list and see that it resolves presence and are able to call the meeting room
  • To make a call from the Pexip Test Call Service
    • Log in to the Pexip Management Node web admin
    • Navigate to Service Configuration -> Test Call Service
    • Click the VMR we created earlier called TestCallService
    • At the bottom of the page you click Dial out to participant
      • Specify Participant alias to be the sip address you are logged in with using your Skype for Business client.
        • I am logged in with adrianl@contoso.com
      • On Protocol, specify Lync / Skype for Business (MS-SIP)
      • Since we have only set up and internal solution, no firewalls should block the path between the client and the Pexip Conferencing node
      • Click Dial out to participant and you should receive the call from Pexip on your Skype for Business client, answer using video and verify that you are able to connect and can hear and see yourself with a 2 second delay
      • You will get an incoming call from TestCallService
    • Answer it and make sure you can hear the service asking you to count to three and that you can hear yourself with a two second delay
  • To make a call from a Skype for Business client
    • Search for and add testcallservice@vc.contoso.com to your contact list
    • Verify that it resolves the name of the room and presence
    • Make a video call and verify that you connect ok to the Pexip Test Call Service and that you can hear yourself with a two second delay

Congratulations! You have now set up a basic Pexip setup with your Skype for Business deployment. This is all there is to it, but of course there is more that needs to be done in order to have a fully integrated video interoperability service. Check out my post on how to integrate Pexip with Skype for Business meetings. There you will learn how to complete Skype for Business and Pexip integration with the ability to join Skype for Business meeting from any video system either directly or via a Pexip Virtual Receptionist.

Next Steps

Awarded Microsoft Most Valuable Professional (MVP) 2016!

mvplogo

I am really proud to be awarded Microsoft Most Valuable Professional (MVP) 2016. This is the sixth time I receive this award and it is a real honor to be part of this community and that Microsoft recognizes my contributions. This time I have been awarded as Office Servers and Services MVP.

The change in the name from Skype for business to a more generic title signifies the change within Microsoft and the move to a more cloud and integrated platform across products. For me this works well since I now work more with the Microsoft platform on-premises, in hybrid and in the cloud and help customers succeed with productivity in general.

I did a talk at Nordic Infrastructure Conference this February where I talked about how to succeed with productivity in Office 365 and EMS in a level 200 session, where Skype for Business is an important component for real-time collaboration. Check out the recording below

Being an MVP helps me stay current on the technology, have a great network to sync my ideas with and learn directly from Microsoft at the MVP Summit. Next up is that I am speaking at the Belgium E-Communications event April 26

About the MVP program: https://mvp.microsoft.com/en-us/overview.aspx
The MVP FAQ: https://mvp.microsoft.com/en-us/faq.aspx

What a year 2014 was!

2014 was a really great year for me. I got to talk at 6 international conferences, start a new branch of Knowledge Factory in Norway and reach over 1 000 000 views on my blog. Thank you all for the opportunities and support. Some memorable moments are listed below with links to my talks. Hopefully something fun will happen in 2015 as well.

01Nicconf2014

02Lyncconf2014

03UCALiveLyncconf2014.3

04KnowledgeFactory2014

05MVPreawarded

06TechEdNA2014

07LyncDay14

08UCALiveLynDay2014

09TechEdEU2014

10TechDays2014

11YouTube2014

11msunified2014


Five years of blogging and 1,000,000 hits!

ThankYou!First off, thanks to all who have visited msunified.net and given feedback to the blogposts. I am stoked that my blog msunified.net now has more than 1,000,000 hits. Since I started blogging in 2009 it has been the place where I post my notes from the field, collections of links and Thoughts on UC.

Some of the most popular blogposts of all time

  1. Installing Exchange 2010 Prerequisites on Server 2008 R2
  2. Enabling Lync Server 2010 for Lync Mobile Clients
  3. Installing Lync Server 2010 Prerequisites on Windows Server 2008 R2
  4. Configure Exchange 2010 InternalUrl PowerShell script
  5. Lync Server 2010 features and how to configure them
  6. Lync Server Mobility Troubleshooting Tips
  7. Lync Server 2010 Troubleshooting Tips
  8. Installing OCS 2007 R2 Prerequisites on Windows Server 2008 R2
  9. Script for Configuring Exchange 2010 Internal and External URLs
  10. Lync Server Front End: Lost connection to the Web Conferencing Edge Server
  11. Lync client sign-in and DNS records recommendations

Some of the most popular blogposts the year of 2014

  1. Installing Exchange 2010 Prerequisites on Server 2008 R2
  2. Lync client sign-in and DNS records recommendations
  3. Enabling Lync Server 2010 for Lync Mobile Clients
  4. Lync 2013 Downloads
  5. Configure Exchange 2010 InternalUrl PowerShell script
  6. Lync Server Mobility Troubleshooting Tips
  7. Troubleshooting Office Web Apps Server for Lync
  8. You see only a white screen when viewing Lync 2013 desktop sharing
  9. Installing Lync Server 2010 Prerequisites on Windows Server 2008 R2
  10. TEL, SIP, mailto, and Lync meeting links association

Where do the all time visitors come from

  1. Search engines
  2. TechNet Forums
  3. Twitter

Some thoughts on the activity

  • People are still installing Exchange on Server 2008 R2 :)
  • The old blogposts from 2010 are still relevant
  • Twitter is a relevant platform to reach out to my audience as it is number three all time source for visitors
  • The type of article that drives recurring hits are
    • the ones that solves a specific problem
    • troubleshooting guides
    • link repositories
    • articles explaining how stuff works
  • I also use this blog as a landing page for all my content, but articles like this one will not drive much recurring users, but helps me communicate my thoughts in a better format than the 140 characters on Twitter :)
  • I always try to remember to blog solutions I find to strange problems, typically the solution was tips from multiple sources and by collecting them and describing how I solved the problem is a good blogpost, and will help others having the same problem.

Afterthought

The amount of hits really motivates me to continue share my experiences as an IT-PRO with solutions to problems, but also highlighting not so mainstream knowledge like I do in my LyncPro Tips series and Thoughts on UC YouTube series. Thank you for your continued support :)

OneMillHits1

On December 23 2014 msunified.net reached 1,000,000 views!

State of Unified Communications 2014

Is that time of the year again when Gartner releases their yearly analysis of the Unified Communications vendors and their offerings called Magic Quadrant for Unified Communications. The vendors evaluated must meet certain criteria which is a product portfolio that supports

  • Voice and telephony
  • Conferencing
  • Messaging
  • Presence and IM
  • Support for different client platforms
  • Support communications-enabled Applications

It is a tradition to comment on the Gartner UC MQ’s here at the msunified.net blog, and have done so since 2009. See the previous articles here:

Awarded Microsoft Most Valuable Professional (MVP) 2014

Today I received the Microsoft MVP Award for my contributions in the Lync Community. This is the fourth time I have received this award, the first time was in 2011. This is huge and it is really inspiring to get recognition for my contributions. Here’s an excerpt from the email I got:

MVP2013

Congratulations! We are pleased to present you with the 2014 Microsoft® MVP Award! This award is given to exceptional technical community leaders who actively share their high quality, real world expertise with others. We appreciate your outstanding contributions in Lync technical communities during the past year.

I feel very honored to be part of this outstanding community and I want to mention the MVP Summit as a highlight of the experience. With all the cool things happening around Lync, Office 365 and Windows 8 I look forward to contribute to the community the coming year as well.

Microsoft takes good care of their MVP’s and we where featured at the keynote at LyncConf :)

??????????????????????????????????????????????????????????????????????????????????????????

Resources

About the MVP Award Program
Lync MVP Awardees
MVPs.org community site
Microsoft MVP FAQ

Control your Lync presence during a Pomodoro Sprint using PowerShell

This article is for you Lync-PRO’s out there who want to differentiate yourself from the average Lync user and at the same time want to reach true flow state using the Pomodoro Technique

This article discusses

  • The Pomodoro Technique
  • Flow state by Jason Silva
  • My Lync controlling Pomodoro PowerShell Script
  • The Script

Continue reading

Gartner Magic Quadrant for Unified Communications 2013

Is that time of the year again when Gartner releases their yearly analysis of the Unified Communications vendors and their offerings called Magic Quadrant for Unified Communications. The vendors evaluated must meet certain criteria which is a product portfolio that supports

  • Voice and telephony
  • Conferencing
  • Messaging
  • Presence and IM
  • Support for different client platforms
  • Support communications-enabled Applications

It is a tradition to comment on the Gartner UC MQ’s here at the msunified.net blog, and have done so since 2009. See the previous articles here: